
Apple canning and preservation continues into this week, and while I am happy to be canning, I will be kind of glad to be done with apples soon. On Friday I dipped my toe into new territory, flavored syrup. I wanted to try my hand at making apple syrup without the addition of corn syrup to the mix. I started off by using one of the two gallon bags of apple cuttings from the freezer. To the bag of cuttings, I also added three whole apples to the pot.

I followed the same procedure as
making juice for the apple jelly. I measured out the apple parts and added the proportional amount of water to the pot, brought it to a boil, and then simmered to for a full 25 minutes. From there I drained it all through the jelly bag. This time, it was quite a bit more substance in the bag with less juice since I used mostly peelings and cores and very little overall flesh. Also, I missed the jelly bag a bit when emptying the pot. I had to run the juice through another mesh to make sure I got all of the solids out of the juice.
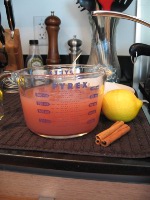
I got around three cups of juice out of the cuttings and a few apples. It was more than I had hoped for, and the experimentation was on. I looked over several recipes from my books and settled on a method rather than an actual recipe over another. I picked a couple of good cinnamon sticks to add to the syrup and also lemon juice for color and acidity boosting. From there it was crossed fingers and hopes for a good result.

I made a sugar solution and then cooked it until I made a very thick syrup. I brought the sugar syrup to just under the soft ball stage of heating, 230 degrees F or 110 degrees C. (You may have to adjust for altitude depending on where you live.) This seemed like a rather dicey operation as I loathe sugar burns, and I was not too sure how the introduction of the room temperature apple juice to the super hot sugar syrup would react. I added in the cinnamon sticks first to cook for a bit and to loosen them up a bit for the short cooking of the syrup. Next, I slowly but constantly added in all the apple juice.

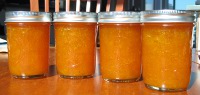
From this point, I brought the solution up to a boil again over high heat. I boiled this all together for five minutes, stirring occasionally. I then removed this from heat, added the juice of a lemon, and then I commenced the canning. I processed the jars for 10 minutes with a 1/4 inch head space. We opened one jar right away on Saturday morning to see how it all turned out. I was really pleased with the flavor of the syrup. It was not too sweet, and the apple flavor was the main star with cinnamon playing a supporting rather than starring role. I think that the next time I make this I would definitely cook the apple juice and syrup mixture together longer. I think the extra cook time would have helped make it more solid and a bit less runny. It was overall a great first attempt I think.

We ended up with five half pints of the syrup. It was great over apple pancakes with whipped cream and some extra cinnamon. I also plan on using it as a topping for apple cinnamon ice cream or it could be used to soak pieces of sponge cake or angel food cake in for a quick fall flavored dessert.
 No Corn Syrup Apple Syrup
3 cups of apple cuttings
3 apples, washed and rough cut with only seeds removed
2 cinnamon sticks
2 1/2 cup sugar
5 cups water separated
1/8 cup lemon juice
To Prepare the Juice Using cuttings from apple canning earlier in the week and a few whole apples to equal 3 cups of apple parts or starting with fresh apples, select about one fourth under ripe and three fourths fully ripe tart apples. Sort, wash and remove stem and blossom ends. Do not pare of core. (I do remove all the seeds though.) Cut apples into small pieces. Add 3 cups water, cover and bring to a boil on high heat. Reduce heat and simmer for 20 to 25 minutes, or until apples are soft. Extract the juice using a moistened jelly bag. This takes around 2 hours. If you want a clear juice, do not squeeze the bag. For clearer juice, refrigerate the overnight and skim off any solids that are in the juice. If using fresh apples, keep solids from the jelly bag to make apple butter.
After the juice is extracted, prepare canner jars and lids, In a clean stainless steel saucepan, combine sugar and water. Bring to a boil over medium-high heat stirring to dissolve all the sugar. Cook the mixture until it creates a syrup and reaches the temperature of 230 degrees F or 110 degrees C, adjusting for altitude. Add cinnamon sticks to the mixture and cook for a minute. Slowly and constantly add the apple juice to the sugar syrup. Return to a boil and boil for 5 minutes or until a thickness you desire. Stir occasionally. Turn off heat, add lemon juice. Ladle hot syrup into the hot jars. Leave 1/4 inch headspace. Place jars in canner and process for 10 minutes.
This yielded 5 half pints when I tried it.
I will see how the syrup reacts over time to both being refrigerated as well as shelf storage. I am not sure if it will thicken any, but it was super tasty. I doubt there will be much time to watch it on the shelf as I am sure it will be eaten fast.
 During last week's canning madness, tomatoes went on super sale at one of the local markets. I could not resist; they were Romas. I went into full tomato canning mode. I decided it was time to make salsa. Now some of you may be scratching your heads looking at this ingredients picture as there are no tomatoes in this one. Well that is because I also wanted to try my hand at peach salsa this year as well. I cut up all the ingredients that both salsas shared in the morning and then cooked them up that afternoon. I made one critical error however.
 After cutting up all the peppers, onion, and garlic, I peeled the peaches and started to notice my hands were tingling a bit. I decided to ignore this and start cooking up the peach salsa. My hands seemed to be on fire, but I just thought it was the overly hot day and the hot items on the stove. I gave it no thought as I stirred away and then put the very pretty peach salsa in the jars. I loved the way the colors all complimented each other in this salsa. It looked pretty and while I did not taste test it, the salsa also looked mighty tasty.
 The burning started to get worse as I was working on cleaning up from this batch of salsa to prepare for the other one. By this time two hours had passed from the cutting of ingredients to now, and as I washed off the pots and canning equipment, the burning got worse. It was then that I realized the error of my ways. I had cut all the jalapeno peppers with no gloves on... all six of them. Now it is a big joke around the house and family as to my whimpiness when it comes to spicy food, but at this point I was in full on pain. I was having an allergic reaction to the capsaicin in the peppers.
  Now some of you may be wondering why this did not happen last year, and I was doing this too as I was trying to wash off my hands as well as I could. Then it dawned on me that my wonderful husband had cut them last year and had a similar, all be it less crazy, reaction to the capsaicin. After much soap and water, nothing was improving. I turned my attention to milk. I rinsed and soaked my hands in milk. All seemed to be fine. We left to go out to the Eat Real fest for lunch.
 Once in the fest, I thought all was okay. I figured that at this point the burning was just part of my mind thinking it was still burning. I hoped that the distractions of the food and festivities would make it all go away as it was just in my mind after all. Wrong! Dead wrong. The burning came back with a vengeance. My hands started to swell and turn purple. It was time for some serious intervention. We returned home quickly and moved up in butter fat, from skim milk to half and half!
 After repeated dunks into the half and half interspersed with alcohol scrubbing, my hands finally were free of the burn. It was a six hour odyssey of skin numbing pain, but it was finally over. I vowed to only use the food processor or rubber gloves from here on out when touching any spicy peppers. It was then time to cook up the tomato salsa. I slipped the skins off the tomatoes using boiling water and then an ice bath. Boy did that ice bath feel good. It helped with the residual swelling that my hands were still experiencing.
 From there it was just dicing of the peeled tomatoes and then adding in all the already prepped vegetables into the pot for their cook and then filling up the jars and water bath time. I was happy to see this project end. I ended up with some left over in the pot for this batch, so I let it cool in the fridge. The taste test of the left overs made me very happy and made Dan ask why I did not make more. This salsa was much improved over last year's salsa debacle. I cannot wait to pop open a jar of the peach to see how that one tastes. I need to remember to save some from now on to taste later. I guess my zeal to stop the burning of my hands and to finish off two canning projects in one day just took over. The pantry is starting to fill up to capacity, but there are more projects to show off and still finish. Check back tomorrow for tomatoes day two!







 Posts
Posts

