Friday, August 27, 2010

Dehydrator Fun - Fruit Leather

Dan and I love fruit roll ups and fruit leathers, but we really do not like their steep price tag. One of the reasons we bought the dehydrator last year was the possibility of making fruit leathers at home at a much cheaper price point. Yesterday was my first stab at making them in our dehydrator. Let me just tell you, it was so easy, I think we will be buying more leather trays for the dehydrator so that I can make more leather each time we hook up the dehydrator.

I tried my hand at both plain apple as well as apricot fruit leather. The plain apple was easy, and the apricot was just as easy to make. I peeled and cored the apples as well as cut them into some smaller pieces. They then went into the blender. I added a tiny bit of all natural apple juice into the blender to help it get started. Then, I blended the apples until they were a smooth, baby food like consistency. I found it easiest to start with a small amount of apples in the blender and then add to that amount and blend again. This seemed to be better than packing too much into the blender on the first try. I found myself having to stop and stir much more when I over packed the blender.

Once the apples were blended, I poured the puree onto a fruit leather sheet. Two important things were learned here. Make sure your leather sheets are already placed on the trays before filling them with puree. Although I did not make this mistake, I could tell that the puree would be everywhere when trying to transplant the flimsy try into the more sturdy drying rack. The second thing I learned is that putting a thin coating of oil onto the fruit leather sheet is a must. I forgot to do this with the first set of leather, and it is quite stuck down onto the sheet. The second one that I did remember to oil peels up quite easily.

Once I had one tray loaded with plain apple, I tossed in the pitted and cut apricot pieces into the blender along with some more peeled sliced apples for their pectin content. For the apricots, I left their skin on, and it seemed to add a nice texture to the puree. I placed that on the sheet and both went into the dehydrator. In the end they look like this picture here. I did over dry them a bit as I forgot to tell Dan to check them when he got home from work versus me shutting them off when I got home late that night from the dance studio. These first ones seem to have the texture of store bought fruit roll ups rather than a fruit leather, but hey I am not complaining. I love both kinds of dried fruits. I can see this is going to become a new habit around here, and I hope that the dehydrator and blender can keep up with our demand.

Thursday, August 26, 2010

Happy 8/26 Day!

As most of you know from reading this blog, I am a volunteer tutor at 826 Valencia in San Francisco. It is a wonderful tutoring and writing program in the Mission district in the city, and it is also the only independent pirate supply store in the city! ;) I have to say that this is one of the most fun things I do all week. I go into the center and partner with with one, two, and even three kids to work on their homework together. It is all the fun parts of teaching that I miss and none of the stuff that I did not like about the teaching field. It is just pure fun. While the center has all sorts of great volunteers, it still needs money to operate. Now I am not usually one to go out and solicit people for money, but this is really a great place to put your extra cash if you have some. 826 National has chapters all over the United States that help out students with homework as well as in schools programs that help teachers do all those fun and enriching projects they would love to do but need extra hands for. We also do bookmaking field trips to get kids into the love of reading and writing. So, in celebration of 8/26 Day, you could help out the national organization by donating $10, $8.26 of which goes to us by texting "WRITE" to 20222, or give on line at http://www.826on826.org. It really is that simple. Spread the word if you are so inclined to help us out. If you choose the texting option, a one-time donation of $10.00 (an $8.26 donation and a $1.74 service fee) will be added to your mobile phone bill or deducted from your prepaid balance. Messaging rates and additional fees may apply. All charges are billed by and payable to your mobile service provider. Service is available on most carriers. Donations are collected for the benefit of 826 by the Mobile Giving Foundation and subject to the terms found at www.hmgf.org/t. You can unsubscribe at any time by texting STOP to 20222; reply HELP to 20222 for help.

Also today, we are holding a Write-A-Thon at 826 Valencia from noon until 8:26 pm. I will be there writing for a while after tutoring before I head over to the Fat Chance studio. Some of you are wondering what this Write-a-Thon may be. Well, the fine people at 826 Valencia wrote the following about it:

"What is a "Write-a-thon," exactly? It's just like a marathon. Well, maybe not just like a marathon. Our ambitious, inspired, industrious writers will recruit friends, family members, housemates, and hairdressers to pledge to support them in their writing goal, be it two poems or 200 pages, at a suggested donation rate of $10 per page. Donors can choose to support writers in whole or in part—if your friend is going to write those 200 pages, you can pledge to support twenty of them, or ten, or two. It's entirely up to you!

We're going to write and write and write some more, for a grand total of eight hours and twenty-six minutes of writing frenzy. Pledge to support your favorite writer, or come join the whirlwind of writerly activity! This event is open to students, 826 Valencia volunteers, and the public. For details, please visit our website. Hope to see you later today!"

Well I am off for some quick sorting around the crafting studio before heading in to tutor, write, and go to class. Thanks for listening to my little speech about 826. It really means a lot to me. Check in tomorrow for some more dehydrating and canning fun.

Wednesday, August 25, 2010

Raisin Experiments

Things have been rather hot and steamy here in the Bay Area as we are experiencing a bit of a late summer heat wave. During this time, I have been scaling back the canning because it is no fun in the heat to stand over bubbling pots of hot liquids. I decided to try my hand at drying grapes into raisins. I love fresh raisins from the farmer's market, but often times I just cannot justify the expensive price tag. I thought that perhaps I could get similar results at home with my dehydrator as the grapes dried in the sun.

After a good washing, I decided to follow the guide book and blanch the grapes in boiling water. My dehydration book suggested a three minute dip in the water, but I think this was just too much. The skins of the grapes split open and the flesh started cooking. I think the next time I make raisins I will just not blanch them and see what color loss I have. The split skins made for a sticky finished product.

From there the grapes had to be plucked off of their stems and placed onto the drying sheets. This was made a bit harder due to not only the split skins but the searing heat the grapes retained long after being taken out of the water bath. The nice thing about making my own raisins though is that I can make sure there are no little pieces of stem still attached to the finished product. Nothing is more annoying than eating oatmeal or a cookie or other baked item and finding stems in your food.

The grapes were rather large, so the estimated drying time was quite off. It took nearly a full day for them to dry rather than the 10 hours the books predicted. There were also some still way too hydrated to store, so I just ate them immediately. I am not sure which type we are going to like better. The flame grapes have an almost candy like flavor and texture to them. It is more similar to a date rather than a raisin. I also love their bright pinkish purple color.

The black grapes look and taste more like commercially produced grapes. The biggest problem with them is the size. They were not dry for quite some time, and they also were quite sticky due to the split skins. They are, however, the nice dark color that grapes generally have. I will have to stir some into oatmeal soon to determine if I like them better. If I do, I will be buying end of the day grapes for the dehydrator soon.

I could not leave the canning completely behind. I did do a small batch of Brittany apricot jam yesterday. It was a hot job even in the morning. From there it was on to reorganizing the sewing room. There is a lot of sorting and putting away to be done after the big "renovation" that I did. I had to make room for the new computerized cutter, so furniture was cleared off and moved around the room. I like the new layout of the room much better than any of the other incarnations. The computer is now easier to use as the glare from the windows is no longer a factor, and the sewing table is closer to the windows for some much needed natural light. Now I just need to sort through all these little odds and ends that I have wanted to organize for some time. I think this requires a trip to the store for some organizational bins, my biggest weakness. There is a mess to clean and new software to learn. If you don't hear from me for a while it is because I am cutting up a storm with the new cutter!

Monday, August 23, 2010

Apple Syrup and Pancakes

Apple canning and preservation continues into this week, and while I am happy to be canning, I will be kind of glad to be done with apples soon. On Friday I dipped my toe into new territory, flavored syrup. I wanted to try my hand at making apple syrup without the addition of corn syrup to the mix. I started off by using one of the two gallon bags of apple cuttings from the freezer. To the bag of cuttings, I also added three whole apples to the pot.

I followed the same procedure as making juice for the apple jelly. I measured out the apple parts and added the proportional amount of water to the pot, brought it to a boil, and then simmered to for a full 25 minutes. From there I drained it all through the jelly bag. This time, it was quite a bit more substance in the bag with less juice since I used mostly peelings and cores and very little overall flesh. Also, I missed the jelly bag a bit when emptying the pot. I had to run the juice through another mesh to make sure I got all of the solids out of the juice.

I got around three cups of juice out of the cuttings and a few apples. It was more than I had hoped for, and the experimentation was on. I looked over several recipes from my books and settled on a method rather than an actual recipe over another. I picked a couple of good cinnamon sticks to add to the syrup and also lemon juice for color and acidity boosting. From there it was crossed fingers and hopes for a good result.

I made a sugar solution and then cooked it until I made a very thick syrup. I brought the sugar syrup to just under the soft ball stage of heating, 230 degrees F or 110 degrees C. (You may have to adjust for altitude depending on where you live.) This seemed like a rather dicey operation as I loathe sugar burns, and I was not too sure how the introduction of the room temperature apple juice to the super hot sugar syrup would react. I added in the cinnamon sticks first to cook for a bit and to loosen them up a bit for the short cooking of the syrup. Next, I slowly but constantly added in all the apple juice.

From this point, I brought the solution up to a boil again over high heat. I boiled this all together for five minutes, stirring occasionally. I then removed this from heat, added the juice of a lemon, and then I commenced the canning. I processed the jars for 10 minutes with a 1/4 inch head space. We opened one jar right away on Saturday morning to see how it all turned out. I was really pleased with the flavor of the syrup. It was not too sweet, and the apple flavor was the main star with cinnamon playing a supporting rather than starring role. I think that the next time I make this I would definitely cook the apple juice and syrup mixture together longer. I think the extra cook time would have helped make it more solid and a bit less runny. It was overall a great first attempt I think.

We ended up with five half pints of the syrup. It was great over apple pancakes with whipped cream and some extra cinnamon. I also plan on using it as a topping for apple cinnamon ice cream or it could be used to soak pieces of sponge cake or angel food cake in for a quick fall flavored dessert.

No Corn Syrup Apple Syrup
3 cups of apple cuttings
3 apples, washed and rough cut with only seeds removed
2 cinnamon sticks
2 1/2 cup sugar
5 cups water separated
1/8 cup lemon juice

To Prepare the Juice Using cuttings from apple canning earlier in the week and a few whole apples to equal 3 cups of apple parts or starting with fresh apples, select about one fourth under ripe and three fourths fully ripe tart apples. Sort, wash and remove stem and blossom ends. Do not pare of core. (I do remove all the seeds though.) Cut apples into small pieces. Add 3 cups water, cover and bring to a boil on high heat. Reduce heat and simmer for 20 to 25 minutes, or until apples are soft. Extract the juice using a moistened jelly bag. This takes around 2 hours. If you want a clear juice, do not squeeze the bag. For clearer juice, refrigerate the overnight and skim off any solids that are in the juice. If using fresh apples, keep solids from the jelly bag to make apple butter.

After the juice is extracted, prepare canner jars and lids, In a clean stainless steel saucepan, combine sugar and water. Bring to a boil over medium-high heat stirring to dissolve all the sugar. Cook the mixture until it creates a syrup and reaches the temperature of 230 degrees F or 110 degrees C, adjusting for altitude. Add cinnamon sticks to the mixture and cook for a minute. Slowly and constantly add the apple juice to the sugar syrup. Return to a boil and boil for 5 minutes or until a thickness you desire. Stir occasionally. Turn off heat, add lemon juice. Ladle hot syrup into the hot jars. Leave 1/4 inch headspace. Place jars in canner and process for 10 minutes.

This yielded 5 half pints when I tried it.

I will see how the syrup reacts over time to both being refrigerated as well as shelf storage. I am not sure if it will thicken any, but it was super tasty. I doubt there will be much time to watch it on the shelf as I am sure it will be eaten fast.

Friday, August 20, 2010

Brandied Apple Rings, Apple Jelly and Butter Recipe

Yesterday was a whirlwind of activity, with tutoring starting again and house straightening to be finished, I managed to squeeze in a some quick canning. I decided to try out a recipe for brandied apple rings this year. I cut down the recipe considerably as I wanted to see if I would like this at all before making big batches of it. I selected out the prettiest red apples for this recipe as the skins are left on the apples.

After a good scrub, it was time to slice them into rings on the v-slicer and a quick dip in lemon water to keep the slices nice and white. I also use an apple corer to get perfect circles cut out of the centers. I do have to go back sometimes to clean up sides of seed casings that are left behind, but I try to maintain a rounded shape as best as I can. I thought these turned out very pretty. Then it was time to cook them in a sugar solution. I did this following the recipe, and I am not sure if the apples have become too soft or if they are just not a good fit for the recipe but they started to disintegrate after only 7 minutes in the syrup. They were supposed to cook for 15 minutes.

I took quick action and just started loading up the jars before I had nothing left. I then added the brandy to the sugar syrup, added it to the jars, and capped them off. Then it was into the water bath for processing. I think they turned out very pretty with the red color that naturally permeates through the jars. The recipe said you could add food coloring if desired, but I kept them plain to see how things naturally would develop. I hope they taste good, but for now, they look pretty and will be an interesting surprise for a later day.

As promised, I am going to post the recipes I use for apple jelly and butter. Please make sure you follow proper canning techniques when making these recipes, including processing finished products as well as maintaining the proper sanitation needed for safe canning.

Apple Jelly
4 cups apple juice (this takes about 3 pounds of apples and 3 cups of water)
2 tablespoons strained lemon juice
3 cups sugar

To Prepare the Juice Select about one fourth under ripe and three fourths fully ripe tart apples. Sort, wash and remove stem and blossom ends. Do not pare of core. (I do remove all the seeds though.) Cut apples into small pieces. Add water, cover and bring to a boil on high heat. Reduce heat and simmer for 20 to 25 minutes, or until apples are soft. Extract the juice using a moistened jelly bag. This takes around 2 hours. If you want a clear jelly, do not squeeze the bag. For clearer jelly, refrigerate the juice overnight and skim off any solids that are in the juice. Keep solids from the jelly bag to make apple butter.

To Make Jelly Measure apple juice into a kettle. Adjust proportions of sugar to juice if necessary. Add lemon juice and sugar and stir well. Boil over high heat to 220 degrees F,if you are at higher elevations to 8 degrees above the boiling point of water, or until jelly mixture sheets from a spoon. Remove from heat, skim off foam quickly. Pour into prepared and sterilized jars leaving 1/4 inch head space. Seal and process for 10 minutes in water bath.

Yields 3 to 4 eight ounce jelly jars.

Recipe amended to take into account higher elevations. Also look at the comments section below for my comment to learn an easier way to test for the set of jelly rather than the sheeting from the spoon.

Apple Butter

2 quarts of cooked apple pulp
4 cups sugar
2 teaspoons cinnamon
1/4 teaspoon ground cloves
dash of allspice

Use apple pulp left over from preparing the apple jelly. Run the pulp from the jelly bag through a food mill or fine sieve to remove seeds, skin, and seed casings from the pulp. Measure the pulp and adjust sugar and spices proportionally to the pulp measurement. Add sugar and spices. Cook on medium low until the flavors are well blended, about 15 minutes. To prevent sticking, stir frequently as he mixture thickens. If the butter gets too thick for your liking, you can add a small amount of apple juice or water to thin. Pour hot apple butter into hot, sterilized jars leaving 1/4 inch head space. Process pints and half pints for 15 minutes in water bath.

Yields about 5 pints.

Thursday, August 19, 2010

Fresh Bread and Pie

I tried Reinheart's soft sandwich bread out of Artisan Bread Everyday yesterday, and I have to say that I was very pleased with the results. The dough is rather easy to make and took me only 20 minutes the night before to mix up. The recipe makes two loaves, and since there are only the two of us, I debated cutting the recipe in half. I decided on making the full recipe and trying to freeze half of it after the overnight fermentation. I will let you know the results of this experiment when I need to make sandwich bread again in the coming weeks. The dough the next day was velvety and soft feeling. It was just a great feeling dough.

I segmented into the two loaves, rounded one and placed it into the oiled zipper bag and froze it just like I have done with the lean bread from this book. The other loaf was shaped, placed into the greased tin and left to rise for two and a half hours. I slipped the risen loaf into the oven for 40 minutes, the shortest cook time, and found this beautiful golden brown bread. The crust on the top was just right. I have to say that the gold touch pans from Williams-Sonoma really do a wonderful job with bread and the crispness of the crust around the full loaf.

When I cut it open, I found this beautiful crumb with just the right amount of bubbles in the dough for lightness. It is a more dense bread than store bought to be sure, but it is also velvety and moist. The texture is soft yet firm enough that it does not collapse into a compressed mess. What did I put on this too too decedent bread? Why peanut butter and homemade jelly of course! I know, it seems so unclassy for this royal sandwich bread, but it was what I was craving. Now to just find myself a perfect bread box, so my bread can last a bit longer. Currently it is wrapped up in waxed paper in an attempt to keep it decent for the next few days. I had it for toast this morning, and while the interior is still wonderful, the crust is starting to lose a bit of its crunch.

After bread baking, I went on a quest to find more lemons as I had run out. I needed them to start the next project, apple pie filling. I processed more apples into the dehydrator and then I was off to the races getting the pie filling made. I have to recommend the v slicer or a mandolin if you are thinking of doing apple pie filling or dehydrating mass quantities of apple slices. It really does make fast work out of the slicing, and it also ensures that your slices are all the same perfect size.

Once the slices were treated against browning, they had to be blanched for a little bit to facilitate the canning process by bringing them to a hot temperature. Next the goopy filling that goes between the apple slices was made. I followed the recipe from The Ball Complete Book of Home Preserving, and I think this is another winner out of that book. The Clear Jel really makes it all work well. After the goop was made, in went the apple slices and a quick boil was reached. Then packing them into the jars and into the canner for processing.

I found that this recipe ran a bit short on its estimate of yield. I only got five full pints and a scant sixth when the recipe says it makes seven pints. Perhaps my half circle slices were too large to measure out the 12 cups as exactly as they did in the recipe. No matter as I am sure this will not be my only batch of apple pie filling this year. I am sure once we go apple and grape picking this fall that more will be made.

I can my pie filling into pints rather than quarts because a quart perfectly fills our mini pie pan. This pie was made last night out of the scant pint that was left over. It had just too much air space in the jar to reasonably store it, so I used it right away! Hey, no one is complaining here!

I had some requests for the apple jelly and apple butter recipes that I used for yesterday's blog posting. I will post them tomorrow in the blog. Check back to get those recipes then. Today is a really busy day as it is the first day back for me at 826 Valencia for after school tutoring. I still have some canning I am going to try to get done before I leave for that as well as getting my dance class clothing ready and the house straightened up a bit. I promise wholeheartedly to post those recipes tomorrow.

Wednesday, August 18, 2010

Apple Jelly and Butter

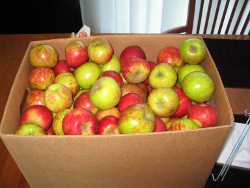
Yesterday was an intense day in the canning process. I did both batches of apple jelly and apple butter as well as drying more apples in the dehydrator. Apple jelly and apple butter do go hand in hand as the jelly uses only the juice from the fruit, so the butter uses up the spend flesh from the juicing process. The only waste is the skins that are stripped away when making the apple butter. I did a batch and a half of the apple jelly as it has always been one of our favorite things to spread on fresh rolls with dinner.

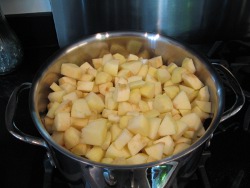
I rough chopped up the apples after washing them. It was kind of nice not having to peel and core everything. I did, however, remove all the seeds from the apples before putting them in the pot with the water to cook out their juices. An episode of G.I. Joe once had them destroy a blob like monster by running it into an apple orchard. They reasoned that the poison in apple seeds would kill this monster, and it did. Hence, my paranoia of apple seeds was born, and my fear of cooking the apples with seeds present continues to this day. The apples cooked at a low simmer for 30 minutes, filling the house with a wonderful perfume smell. It is one of the aspects of the Gravenstein apple that I really do love. From there, the pulp and juice was carefully and slowly poured into the jelly bag to drain.

Now 
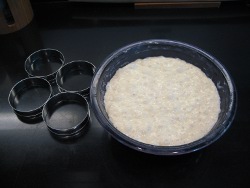
last year I did my jelly using a pair of nylons as my jelly bag, and this is a wonderful and cheap way to do jelly. I just recommend using a new and nicely cleaned pair when you do this. My kitchen, however does not have any place good to hang a nylon from, so I splurged and bought a Fox Run jelly bag set. I found this to be a nice set so long as one does not over fill the bag. It is held onto the ring with elastic, so if the weight is too much it will pull itself off the ring. My batch and a half of apple jelly was right on the edge. I did not squeeze the bag this year either as I had more time to let it all drain. This jelly bag did a tremendous job of not letting any solids through, so I did not have to restrain the juice before putting it into the pan for the cook.

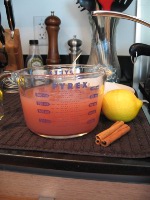
Here is the small amount of overrun from the jelly. I took this picture from the top, so you could see how clear it turned out. I also had minimal foam to skim which resulted in five beautiful jars of perfectly clear blush colored apple jelly. The especially nice thing about having a little left over is that you can taste the early results of your work. We had this with some bread and soup for dinner. It was very light and fragrant, and the set on it was firm yet spreadable. I could turn the cup over without the jelly moving or sliding. A good set indeed!

From there, I squeezed the pulp back out of the bag and into my newly acquired vintage Foley food mill. This was the inaugural run for this, so I was super excited to try it out. The food mill worked like a charm, and with some prodding and poking, I got all the pulp out that I possibly could and left behind only the small scraps of skins from the pulp. It felt very satisfying to be able to use the spent pulp this year to make the apple butter. If you are not making apple jelly and want to just make apple butter, I posted 
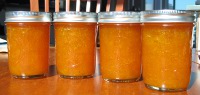
my sister's wonderful crock pot apple butter recipe last year around this time. I used her spice ratio to season this year's pulp as well.

Cooking the pulp and spices to get the flavors through the mixture made me wish fall was here already. All the sweet smells of apple, cinnamon, cloves, and allspice created the biggest turkey and stuffing craving I think I have felt in a long time. From there it was a quick trip into the jars, sealing them, and then into the water bath. In the end, I had five half pints of jelly to four half pints of butter. I guess that is a good guideline for future jelly to butter recipes, that the butter will be one jar or so less than the jelly side of things.

Today I have already baked some bread using the Reinheart's Artisan Bread Everyday cookbook. It has made me want to dig right in, but I still have to wait for the loaf to cool. Once it has, I have a feeling that I will be digging in for a sandwich! This loaf looks like one of the best ones I have made yet, and I promise to post pictures and baking notes on it tomorrow. This was my first attempt at his Soft Sandwich Bread, so I hope it all turned out. If it tastes as good as it smells, I think I am in for a real treat.

Hopefully I can try out his recipe for pull apart rolls. Those are our favorite way to convey apple butter to your taste buds. Today I am off to take a quick walk to pick up more lemons. I do not have enough for today's canning plans: apple pie filling! I cannot wait to get this done and make up a pie for tonight's dinner, even if it means more peeling and coring. After that, more apples are going into the dehydrator, and then perhaps some work on my velvet wreath. I hope to get it done before the end of August, and it looks like I am rapidly running out of time.

Tuesday, August 17, 2010

Apple Invasion: Applesauce

Yesterday I mentioned that Dan and I went to the Gravenstein Apple Fair over the weekend. Just like last year, Dan and I picked up a box of apples from Walker Apples - a 40 pound box! It sounds like a lot of apples, but once I am done processing them into all their different components, I wonder if a 40 pound box is enough. I am sure once we have a family, we will be a two or three box purchaser at the fair. As it stands, I am already a good fourth of the way through the box.

Yesterday I made applesauce. I am not quite sure if I would ever buy applesauce again once we started making our own. My mother made ours when we were kids, and I always liked it much better than store bought. This applesauce is also so sweet due to the natural sugars in the Gravenstein apple that I added only a half cup of sugar to the entire pot of apple sauce. I also saved all the peel and core scraps from making it up, so I can make my own pectin and apple syrup experiments. I hope that they turn out as well as the apple sauce did this year.

All I do for my applesauce is I peel, core, and rough chop up the apples and place them into a pot. I then add a bit of pure apple juice if I have it otherwise I add a little water. I adjust the sugar I add depending on the sweetness of the apples, and then I let it cook away over low heat. As it cooks, I periodically stir it up and mash some of the big chunks down. Dan and I like chunky applesauce, so I do not use a food mill. If you love a smooth applesauce, you can skip the skinning and coring and just rough chop your apples and run it through a food mill once it is done cooking. If you like spiced applesauce, you can add cinnamon or cloves or whatever you like to the mix. Since some people don't like spices, I tend to can mine with out the spices and add it later when I serve it up. This way everyone can have their sauce exactly as they like it.

This batch ended up being three quarts and a pint in size. I am told this is simply not enough sauce for the year, so I may be making another batch up this week if there are enough apples after all the other projects are made. Currently I have some of the apples in a jelly bag juicing for apple jelly. Pictures and a synopsis of the progress on that tomorrow. I am also going to take the apple pulp from the jelly and make it into apple butter. I am trying to make as little waste of things as I can this year. I have always been a "waste not want not" kind of person. This year I am hoping to be way more efficient at this than last year. I threw out skins and cores last year. This year, nothing will be wasted if I can help it. For now, I just wished I had a bigger freezer to hold all the apple scraps. I am starting to run out of room!

Monday, August 16, 2010

English Muffin First Attempt

Friday brought about my first attempt at English muffins using Reinhart's recipe from Artisan Bread Everyday. The recipe seems really easy, and at its core it is very easy. Making up the batter like dough the day before baking makes it even easier. The biggest difficulty I had with the recipe was an equipment issue. I was using our cast iron griddle, and it is not quite seasoned enough to do breads. I needed to use a ton of oil to keep the muffins from sticking down.

Once I got the griddle cleaned up a bit from the first few that stuck down, I also realized that you need to let the muffins just tell you when they are ready to be flipped. I know this sounds kind of funny and odd, but they really will tell you when they need to be flipped. I found that if they were sticking to the griddle, they were not cooked enough to flip. By being patient and waiting for them to easily slide onto the spatula, I had a perfectly browned side ready to flip. I do, however, need to practice my flipping technique. It requires a steady hand as you are flipping over a rather tall pancake like dough. The dough is still rather liquid when you flip them, so a couple of the muffins slid over resulting in a lopsided muffin.

In the end I was really pleased with this first attempt at a somewhat hard to make bread. The methods of making the batter were easy; the techniques are the only hard part about it, and with time and practice, I am sure I will get them down as well. The other important thing that the book tells you to do is cool the muffins on their sides. It is a necessary thing as the ones that did not get enough cooling time on their side did collapse down quite a bit and become more dense than the others.

The only other disadvantage of making these at home was the colossal mess made by all the cornmeal that seemed to multiply itself across the counters and cooking surface of the stove. It took me quite a while to find all the granules of the meal and dispose of them. We split the first ones open for a tuna melt dinner on Saturday after returning from the Gravenstein Apple Fair in Sonoma county. They were good, and while not as craggy as a commercially produced English muffin, I thought they tasted great. It was a good dinner to go with apple sorting. We bought a 40 pound box of apples again this year and will be working on processing them into jelly, sauce, dried rings, pectin, and syrup this week. Look for those postings in the coming days.

I did get to canning up those O'Henry peaches that I bought at the Friday Farmer's Market. They were rather unripe, so they should hold for a long time in the syrup. The other thing I got to relearn this year, is that the O'Henry variety of peaches does not peel in the hot water bath like other varieties. I am not quite sure why this is the case, but the 10 pounds of peaches had to be peeled by hand. Luckily we had received a great peeler for Christmas that is designed for peeling peaches and tomatoes. It worked like a dream, and while I felt irritated that I could not just slip the skins, it was much better than peeling with a paring knife.

I worked hard to try to get them done quickly, and as usual I underestimated the time it takes for me to can a bunch of produce. I did get them done from start to finish out of the water bath in two and a half hours. I guess that is not too bad. I ended up with eight pints of sliced peaches for this winter and enough left over that I made a mini peach pie in our 7" pie plate. Despite my cramming into the jar as many slices as could reasonably fit, the fruit is still floating. I guess I need to get better at packing my jars. I know that some of the floating is due to the peaches shrinking up after they are processed and the air inside of the peach flesh collapses and cooks out, but it is still a bit disappointing. Someday, with practice, I will get perfectly suspended peaches. The pie, on the other hand, was wonderful. Dan said it was the best peach pie I have made to date.

Today will be filled with apple processing after I complete my jog. I am hoping to get a bunch of sauce on the stove and then turn my attention to the dried apples. This year nothing will be going to waste, as I am going to make an attempt at homemade apple pectin for next year's cherry jam. I hope the pectin works in that jam so that I don't have to cook and cook the cherries until there is nothing left. I kind of ended up with a cherry spreadable candy this year rather than jam. My attempts at jaming a low pectin fruit without added pectin turned out just as I had predicted. Hey, it never hurts to experiment a bit though. Well I am off for that jog and lots of hours peeling apples.

Friday, August 13, 2010

Peachy Friday

Today has been incredibly busy, hence the late edition of the blog today. Yesterday was peach day, and today will be peach day again if there is enough time. I underestimated my peach needs, so I only got a few jars of this one. It is alright though as I still have a few jars from last year that need to be eaten still. I also was so busy yesterday that I forgot to take a picture of the peaches before they ended up in the pot, so here they are ready for the jamming process.

I did a full cook on these, and they turned into a beautiful golden color. The two and a half pounds ended up to be four full and one half jar of jam. The refrigerator is starting to get rather cluttered with half jars of jams, so I think I will need to make some refrigerator cookies next week to clear things out. It is so cluttered I cannot even imagine fitting the watermelon I just got in there until some of the space is cleared.

I also got some great deals on end of the day produce today at the Farmer's market in Old Oakland. I need to find out what to make with some of the cauliflower and broccoli that I got for cheap. Of course I got all of this just as the weather warms up, so soup is out of the equation. I also got quite a few O'Henry peaches for canning for this winter along with the watermelon. I also made my first attempt at English muffins today. They look pretty good from the outside, but I have yet to fork one open to see what the insides look like. Hopefully tomorrow I can convince Dan to have one with me for breakfast before we head out for the apple fair. Oh and the apple fair... that means more canning goodness! I suppose I should sign off and head into the kitchen to get some jars clean and some peaches peeled.

Thursday, August 12, 2010

Canning Week Day 2 - Apricot Jam

Yesterday was apricot jam day. I got these late season apricots at the market on Sunday and could not wait to get them into their jars. Apricot was the one jam that I did not make enough of last year, and I opened up the last jar of it just a few days ago. I love apricot jam as it is a very versatile thing to have around the house. Aside from the obvious spreading onto toast and English muffins, I also use this jam for jelly rolls, freezer box cookie filling, it makes a great filling between layers of chocolate cake, bbq sauce bases, and glazes for ham or pork roasts.

I think this year's jam will be quite stiff just like last years. The apricots seemed under ripe, so their pectin content was really high. I also figured out why my strawberry was so foamy the day before. I was cooking too quickly and that caused the crystallization problems that resulted in the foaminess. I wished I was able to retain these kinds of lessons better from year to year. I suppose I need to write myself some sort of notes to keep around and review from year to year to ensure no knowledge is lost from the year before. It is kind of like sending a kid on summer vacation, and they remember the big concepts but lose the finer ones until they are back in the swing of things again the next school year.

This year's jam is a bit more golden than last year's deep orange color. I used a different lighter variety of fruit, so I am sure most of that is from the fruit selection. I have found out that apricot is my brother-in-law's favorite jam, so I will be making another batch to share with him if the Brittany apricots come in late this month. If not, I guess it will have to be a rationed out product this year. I am really banking on those Brittanies as they made stellar jam with just the right amount of sweetness and tart undertones.

Today I am tackling the peach jam. I am also hoping to hop on the sewing machine as I did not get to that yesterday. I want to get this project finished and some notes written up before I share the project with you. It is a fun one and also eco-Friendly money saver if you are into that. Well there are the first round of peaches to peel, so I am off.