Friday, November 4, 2011

Finished Friday - Nyan Cat!

For the greater part of two days in October, I was madly cross stitching up this bookmark for my husband's birthday. It was a marathon session to make sure that I got it all done. I was quite happy with how it all turned out. I stitched it up on a blue canvas and used whatever colors I had in my collection to fill in for the colors needed. I think it came out quite well. I would like to thank m00nshine on deviant art for the awesome free cross stitch pattern. I did modify it a bit. I moved the rainbow up a bit on the poptart. I also made the background look more like the actual background in the video. This of course required me watching the video on the internet more than I would like to admit, but hey it does bring me quite a bit of joy to see the poptart covered cat meow its way across the universe. For those of your scratching your heads because you are not well versed in internet memes, I give you video of the Nyan Cat:


I hope you enjoy your weekend! I am looking forward to getting some crafting done as well as planning for the holiday craft onslaught! Look here over the next few weeks for pattern reviews for kid's toys. I hope it helps your crafting plans and eases you into the homemade gift world.

Thursday, November 3, 2011

Recipe Review - Pumpkin Streusel Muffins

One of the few catalogs I love to see in our mail box has got to be the spice catalog from Penzey's Spices. We received a gift box from them as a wedding gift, and I have become an addict ever since. One of the things that I love about the catalog is the recipes they include. The recipes are from fellow Penzey fans and illustrate how to use their spices in the dishes. This last issue was all devoted to Fall and Thanksgiving. I am a fall fiend, and I love all the flavors of fall. Pumpkin is decidedly one of my favorites, so when I spied their recipe for Pumpkin Streusel Muffins from Kathy Ness, I had to make them. They looked too good to pass up. The recipe is quite easy to make. The hardest part is remembering to take out the butter to soften! The big advantage to this recipe for me this particular week is that it does not need paper cups! I somehow ran out of them, so this was a perfect morning muffin for both flavor and no need for anything other than ingredients. In fact, after eating them this morning, I would say that the paper cups would take away from the wonderful texture of the crust on the bottom half of the muffin. It is very similar to making a pumpkin pie as it needs both pumpkin as well as evaporated milk, and this is where I have the smallest of dislikes for the recipe.


The recipe calls for only a 1/4 cup of evaporated milk. This is such a small amount that it makes me wonder what to do with the rest of the can of milk. I am planning on making a mini pumpkin pie with the left overs of the pumpkin and the milk, but there will still be too much milk, plus it would be great to be able to make this with out opening up a can of milk if I wanted to as I can freeze the pumpkin for later or use it in a pumpkin spice coffee. So to the internet I turned, and I found out that you can in fact substitute out evaporated milk for powdered milk and water. I will test the recipe some day soon and let you know how it all turns out  in a Follow Up Friday. For now though, I highly recommend these super tasty muffins! If you try making them with the substitution, I would love to hear what your results were. Until then, happy baking, and I hope you are enjoying fall.

Wednesday, November 2, 2011

Wordless Wednesday - Baked Goods

Apple Crisp Before


Apple Crisp After

Tuesday, November 1, 2011

Apple Pie Filling

I hope everyone had a great Halloween and Samhain holiday. This year I made my first attempt at a more detailed jack o'lantern. I am pretty pleased, but I know for next year to simplify the design quite a bit. Too many fine lines results in me having to break out the toothpicks to hold all the pieces together. Luckily I have a super crafty husband who was great at hiding the toothpicks, so they are not super obvious in holding things together. I am sure glad that we made an attempt. Posting pictures of the Halloween pumpkin always start to set some fear into my soul though, and not for the usual reasons. My mind immediately turns to... yes Christmas. I start to think about all the things that I need to start work on to make sure that the holidays are homemade and happy.

But this is about apple pie filling.... so all those panic filled thoughts of crafting are out of sight and out of mind until I stop writing up this posting. Pie filling! It is a wonderful thing. There is nothing that I find more versatile than having this in my canning arsenal. I can use pie fillings for homemade danishes, pies, turnovers, crisps, cake fillings, pancakes, and cobblers to name a few. Canning pie filling can be a pretty easy and instantly rewarding activity. For doing apples the set up is a bit more complicated. I have a station setup with the washed apples on one side, cutting board in the middle. Once I peel the apples and take out the blossom ends, they get a quick dunk in the lemon juice and water bowl at the top of the cutting board. This helps keep the apples from turning brown and is mostly cosmetic. Once I have the apples cored and sliced, they go into the lemon juice mix again for a little while as I peel the next apple. From there the slices go into the big four cup measuring cup. After I fill the measuring cup generously, I dump any accumulated lemon water back into the first bowl and transfer the slices into the final big bowl. I know that it sounds overly complicated, but it works well for me and ensures that my pie filling looks great.

When I can my pie filling, I like a consistency of store bought. I know that many people do not like the extra thick goop that is in canned pie filling, but I quite enjoy that texture. In order to make sure that you safely can a goop filled pie filling, you need to use Clear Jel. Clear Jel is a specially manufactured corn starch that is safe for canning at high temperatures. If you use flower or arrow root, it will not hold up and from what I understand will separate out and create weird chunks in the filling. I follow the recipe from The Complete Book of Home Preserving from Ball. The recipe from the book has you use a base of apple juice for the filling around the apples. I find that cider gives the best flavor rather than straight up filtered juice. This year I used a combination of a gravenstein cider I found at Trader Joe's as well as the cider we bought on our apple picking trip. The cider is cooked with sugar, spices, and the Clear Jel. A quick tip on working with the Clear Jel is that it works best when mixed with the sugar before adding in the liquid. It makes it less clumpy and easier to stir with less clumps to break up. As the base liquid starts to reach boiling, the Clear Jel will activate, and small clumps of what appear to be burned filling will dot the pan. Don't panic! This is totally normal. Keep stirring constantly, and suddenly, the entire pan will be jelled up pretty solid. Add the lemon juice and then the poached apple slices. Bring it all up to heat and then can following proper procedures.

Now there is one thing I will say about doing this kind of filling... it is super thick! This viscous texture creates all kinds of interesting canning issues. It is virtually impossible to get out all the air bubbles. Try your absolute best. It is also more difficult to get all the filling up to a hot enough temperature to can with out siphoning issues. If the filling gets too hot it will scorch and not taste as great. Make sure you provide a generous inch of head space. Any less and it will be a complete mess. Every time I have done these recipes, for both apple and cherry,  I have horrible siphoning issues. It is imperative that you have towels down when they come out of the water bath. There is typically some of the filling that runs out of each jar and all over the place. I don't seem to have the problem as much with peach, and apple is by far the worst for some reason. Once the jars have sealed and cooled, I take the rings off and scrub down the jars and rings with lots of water and elbow grease. I also make sure to not use hot water as I do not want the seals compromised. Yeah it all sounds like a pain, but it is great to be able to crack open a jar when there is short notice and whip up something that seems rather impressive to last minute guests. The only other suggestion I have for the recipe is halving the amount of nutmeg. I am not sure if it is because we grind our own or if we just do not like a super nutmeg filled pie, but I feel the Ball recipe has too much. This year I halved the amount and am much more happy with the results. Happy canning! Hopefully you can give pie filling a whirl!

Tuesday, October 25, 2011

Fall Favorite - Apples

Fall is one of my favorite seasons. I really do enjoy this time of year mostly for the foods that are in season. Root vegetables, hard winter squashes, brussels's sprouts, and most of all apples. I love all kinds of apples, and I think that there is not a variety that I have tried that I have not liked in some way. Usually, every fall, my husband and I head up to Sebastopol, CA for their annual Gravenstein festival.  It is a great little fest, and I highly recommend it for anyone who loves apples and that small town feeling of a county fair. This year, however, we decided to try something different. This year we went all the way to Camino, CA for the Apple Hill Growers Association harvest weekends. We drove the two and a half hours from the San Francisco Bay area out to Eldorado county and the foothills of the Sierra mountains. Once there, it was a beautiful drive around the winding hills of the Apple Hill area. There were many different farms that had different kinds of activities and events. You can most likely find a farm out there that will fit the kind of day you wish to have.

Many of the farms had large tents with crafts for sale, pony rides for children, corn or hay mazes, and lots of food venders. We wanted a quiet day picking our own apples instead of prepacked boxes and jostling crowds. It took us a bit, but I figured out which farms I wanted to see. The first farm we wanted to visit was Sun Mountain Farms. We finally found this very small and picturesque farm after winding our way around the larger farms that had more for family type entertainment. Sadly, once we started up the driveway, we saw the dreaded sign: Sold Out. I quickly looked back at the map and picked Pine-O-Mine. We raced back down the road and found this farm. They luckily still had apples left to pick. They were a select grower and nestled amongst their tall towering pines were Granny Smith and Fuji trees; two of our favorite varieties for canning. We intended on only getting a few pounds to can as I am running out of empty jars, but we ended up with a half bushel from off of the trees there. Next we ventured to O'Halloran's Apple Trail Ranch. This was another cute farm that had apples pre-picked and sorted into large bins from cold storage. We got another half bushel from these growers. They had all sorts of varieties such as winesap, Rome, and golden delicious among others. They also had pears there, so we picked some of them up too. This particular farm also had pumpkins for ridiculously low prices. Our jack 'o lantern pumpkin was found amongst the sunflowers that dotted their pumpkin patch.

Yesterday was the start of working through the bushel of apples that we bought over the weekend. I love the delicate smell of fresh picked apples, and it was a delightful thing to wake up to that smell in our house. I decided to make sauce today with any of the marginal apples that could cause our good apples to spoil. Applesauce is a very easy thing to make, and it is a great way to use up windfall apples or those with some soft or bad parts to them. Just make sure to completely cut out the damaged parts and compost those pieces. If you are in good with your local grower, this is a great way to save money on your canning as sometimes you can get bruised and windfall apples for a much lower price than pristine apples. Just be sure to ask someone in the know as often times they keep these apples out of sight.

This year I chose to do the sauce in the slow cooker as I wanted to run a bunch of errands. Cooking it this way would free up my time for other things rather than attending a pot of bubbling apple goodness. I made a full recipe from my book; twelve whole pounds of apples were counted out. I made this sauce with a combination of Fuji, for softness and sweetness, and Granny Smith for a firm structure, sour under notes, and lower juice content. I peeled, cored, and rough cut up all the apples. Now I did not get rid of all the cuttings. Those go into a plastic bag in the freezer for later use making pectin for your canning next year or into apple syrup for pancakes. Don't let these things go to waste! Now many people like a totally smooth applesauce, in that case, do not worry about peeling or coring the apples. Just remove the blossom end of the apple and compost that. The blossom end has enzymes that can weaken the natural pectin in the apples. You can then just run the cooked down apples through a food mill right before canning.

The hubby and I personally like chunky applesauce, so the extra peeling and coring are necessary as a food mill is not an option. Once I had the slow cooker as packed to capacity as possible, I added a tiny bit of water to aid the cooking and a very scant cup of sugar. You can feel free to omit the sugar if you want an unsweetened sauce. I also added four tablespoons of lemon juice to help retain the color as well as for added acidity. This is one of those wonderful "set it and forget it" kind of things. I went about my day running errands and picking up around the house. When I would breeze through the kitchen, I would lift up the lid, stir, and chop up the apples in the sauce a bit. After quite some time, the sauce started to finally get saucy and cook down.

After seven or so hours on high, this is what I have. There are distinct areas of sauce and also quite a few big clumps. I could have let this cook longer and continued chopping up the chunks until they were the size I wanted, but dinner needed to be made and these jars needed to get into the water bath. Enter the immersion blender. If you do not have one of these things, I would highly recommend getting one. I never thought I would use one of these as much as I have, but it is a great way of doing many things that would otherwise be a total mess. I am looking at you soup recipes that say to blend them up in a food processor. Now the whole point of not running this through a food mill is that I want some chunkiness, so when I used the blender I only blended up certain areas. I made sure that, even though the immersion blender is a blast to use, I only pulsed it around a few areas.

From here you should taste your sauce. Add sugar if you need to make it sweeter. You can also add spices such as cinnamon, cloves, mace, or nutmeg. I typically choose to not add spices to my canned sauce because I can add it later if needed for a certain recipe. You cannot take it away once it is in the jar after all. Make sure that you leave a generous inch of head space for the jars. I did that this year and still had more siphoning out of the jars than I would like. Perhaps the slow cooker does not keep the sauce hot enough to avoid this problem, or it could be the chunks releasing more of their fluid during the processing. Some day I will figure this out. Twelve pounds made three full quarts and two pints. I also had a little left over for dessert that night. Hopefully this will be enough to get us through to next year... somehow I doubt it!

Monday, October 24, 2011

Canning Week!

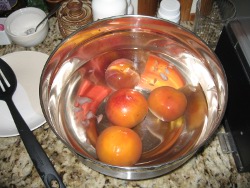
Despite my lack of blog posts, this has not been an idle year for canning. I have done quite a bit, although, I have not done nearly as much quantity as last year. I have tried many different kinds of things in small quantities. I am hoping that by doing some small batch canning I can learn what I like to make and perfect things with out having to eat many, many jars of it. It was very nice when I had my canning partner living out here. I could do full batches of a recipe and split it. It was a good thing to try things at their full recipe to ensure that they had the flavor they were meant to have. Sometimes when recipes are cut, even though the proportions are kept the same, the flavors just don't seem to be quite as vibrant to me. It most likely is just be a personal "perception," not the true reality of the situation. So, in the spirit of trying new things and attempting to get over my want for large quantities of jars bumping around in the water bath, I tried several new recipes this year when the peaches were in season.

I love peaches, and since I missed apricot season this year due to all the traveling, I decided to make extra peach recipes to fill in for the missing favorite of my husband's. I am hoping this stop gap helps me stretch the few jars of apricot that I have left. Often times I can make a one to one substitution for peach jam. This especially works in cases of glazes made for roasted meats. Peach or apricot jam with some soy sauce and freshly graded ginger makes an especially tasty glaze for pork roast or pork chops. A quick filling for crepes, cakes, and jelly rolls, apricot is my go to gal! Peach, however is one of my favorite fruits, so I hope that I can see it into rotation in place of the old family favorite.

Aside from making several jars of plain peach jam, I added some new flavors. One flavor combination I have always enjoyed is peach and ginger. I particularly like peach ginger iced tea. It seemed only natural to try out this combination in jam format. I added candied ginger to a regular peach jam recipe. I mixed up the sugar and peaches, and I cooked the mix until just before the jellying point. At the last most minute, I added finely diced candied ginger. I hoped it would add some nice bite both literally and figuratively to the jam. I have yet to try it, but I will post a Follow Up Friday as soon as I do.

I also made spiced peach jam. I added cinnamon, cloves, and allspice to the jam for this one. I have to say that there is nothing quite like spiced peach jam on a freshly toasted English muffin for a cold morning's breakfast. The warmth of the spice profile on this reminds me of the spiced peach slices I would get in Amish country in Illinois. I tried this one right away as I thought it did not set up correctly. While the set is a bit soft compared to most of my other fruit jams, this is nothing out of the ordinary. My peach always sets a bit loose compared to other fruits. I guess the pectin of the over ripe peaches you get in California farmer's markets must contribute to this, but I would not trade the flavor of the fully ripe peaches for the pectin of less ripe ones.

A new addition to the canning recipes this year was one I found in a Martha Stewart Living magazine. I decided to try out her recipe for 
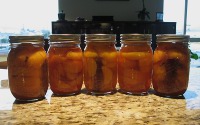
bourbon poached peaches. It smelled delicious, and the combination of vanilla and my personal favorite, Jack Daniel's whiskey, made for a good combination. I have not tried any of these yet, but I am looking forward to some peach pancakes. The excess syrup for this recipe tasted wonderful, and I wanted to try to cook it down into a pancake syrup. This turned out to be somewhat disastrous. With the high sugar content, and my patience wearing thing, I tried to cook it down way too fast. I ended up making essentially a hard candy that I then canned into jars. I did not realize the error of my ways until the next day. I tried tipping the jars over to see their wonderful syrup ready for pancakes, but it was solidified in the glass. It almost took a jack hammer to get my jars back, but with enough hot water and elbow grease, I was back to having usable jars.

In the end, I had four jars of wonderfully poached peaches and no jars of pancake syrup. I made sure to cut up the vanilla bean into enough pieces so each jar got one. I hope that this does more than look pretty; I hope it creates an intense flavor of vanilla. I could see this recipe being a great accompaniment to vanilla ice cream or any number of cakes whether they be chiffon, pound, or angel food. As soon as I get a jar open and a good opinion on the recipe, I will also post back with a Follow Up Friday.

I also canned some straight up peach slices and spiced slices. It is a nice change of pace for me to crack open a jar of these summer fruits when in the dead of winter. Having a slight allergy to citrus fruits means that eating seasonally can sometimes be an itchy affair. While I love citrus fruit and do eat it quite often, I can only indulge so much. I have a feeling these will as usual come in handy, especially with that margarita made from peach canning liquid recipe floating around the internet lately.

While peach canning season is most likely over for you all, I thought I would just show off what I was doing all those days when nothing was getting posted up on the blog. I have my work cut out for me this week. I, like everyone else I am reading lately, am headed into a week of apple canning. There is sauce and pie filling to be made. Someday, this will include fresh pressed ciders, but until we have a house this will only be a canning dream. I am also excited to try out a new jelly recipe that is apple based. If it turns out how I am envisioning it will, I will have another thing to reside in the half pints.

There is so much to do, and with holiday crafting on the horizon, I am trying to get as much into every day as I can. Things on the agenda today include weeding the garden plot, hopefully some personal sewing, as well as some holiday crafting... yes I really am going to start in October this year! Then there is the matter of preserving the bushel of apples sitting in the kitchen... For now though, I am off to the garden to make sure all is in order there. As usual, so much to do and seemingly no time to do it in.

Wednesday, October 19, 2011

Wordless Wednesday - Indoor Cucumber Plant

People thought I was crazy for trying, but here is the first cucumber growing on my indoor cucumber plant. Not the right conditions for it to grow, but the resiliency of plants is amazing.

Monday, October 17, 2011

Sighs of Contentment

I know that I keep promising to post to the blog in a regular fashion as well as roll out some new content, but things have just been so crazy. I feel like things are finally starting to get to a point where I can post here more regularly again. I think Juila of What Julia Ate sums up perfectly what I am feeling lately in this blog posting. I feel like I have so many plates spinning that something has to eventually be cut out or the whole delicate balancing act will fall to the ground. Lately it has been the blog that has crashed to the ground. Yet in amongst the crazy spinning, I have wanted to add more things and have been doing so. I have picked back up my cross stitch work and added working on a needle turn applique that I tried to learn at Chaos Wars this year. It was a great class taught by a dear friend, and it made me feel so guilty that the beautiful class piece was sitting there unfinished. There are gifts to be made for tomorrow's birthday celebration, and the up coming holiday crafting season as well. It all starts to feel overwhelming. The garden is humming along, but it is a new thing on the routine that needs constant care and looking after. Then there is the growing list of things to read and knowledge to obtain, dance lessons and being in shape for those strenuous classes. I hate to sound like a complainer, but it seems like there is so much to learn in this lifetime and just so little time to complete it all. I guess fall always turns my thoughts to this as the days become shorter and things begin to die off and go into winter modes. I am striving harder to get organized and make it all work, and I think I am making headway. I mean... here is a blog posting after all! I was also inspired this weekend after the mini Maker Faire to get back to creating and stop worrying so much about the small details... yes read that as house cleaning. I hope to have a canning update for you tomorrow, and I am adding to the schedule a wordless Wednesday. There are always too many pictures and, forgive me fellow 826'ers, but sometimes too little time to write as I would like. Look for Follow Up Friday's as well. I will go back to old projects and give reviews on how things turned out or updates on progress. I am hoping this will also help me stay on top of completing things. Thanks for sticking with me through the inconsistent writing and promises for things that don't ever seem to materialize. I thank you for checking back and reading.

Monday, September 19, 2011

Life is Peachy!

Life is peachy lately. Things seem to be humming along at a fast pace, and my days are filled with all sorts of urban homesteading activities. Aside from the canning, I now have the garden to tend. Let me tell you, I am loving getting my hands dirty and weeding away. I am also staring Christmas crafting in the face. I hope to get an early start this year... just like every year. For now, though, I am thoroughly busy with canning. As you can see by my lack of posting, most of my time has been occupied with things like canning. At the end of August, it was all about peaches. I bought a 25 pound box of peaches as well as a couple of other pounds along the way for canning projects. The first thing I do when I take home a large box of any produce is to sort it right away looking for any bruised fruit. The bruised fruit gets quarantined from the rest of the lot to ensure that no further spoilage is encouraged. This box had just enough fruit with bruises and spoilage for an early peach cobbler.

This time around, I decided to try out the recipe from Cook's Illustrated. If you do not have a subscription to the website, I highly recommend it. The amount of recipes at your fingertips as well as knowledgeable equipment reviews are well worth the subscription fee in my opinion. I have to say that the recipe was rather fussy, but I felt like it was worth it, at least for the topping. One thing that I do recognize now is that I will no longer be using the boiling water technique in these pictures for peeling peaches ever again. I find that this method does not work very well for my favorite type of peach, the O'Henry. While this is a super freestone peach, it does not want to be skinned for some reason. I have, therefore, decided to only peel them from now on with my awesome Messermeister serrated peeler. Yes the peeler is a bit expensive, but I have to say it is well worth the price. I will, however, miss the beautiful color that the boiling water turns when scalding the peaches. It is the most wonderful purple hue!

The other big advantage of the O'Henry peach is that it remains firm even through cooking. I like that the flesh does not all go to mush when processing it or turning it into a cobbler or pie. The slices still have integrity and a wonderful texture. Here is where the recipe gets a bit fussy, and while the step is totally necessary for a good result, I wished there was another way. The recipe has you macerate and strain off the extra juice from the peaches so that the cobbler does not become a soupy mess. The topping was another story. It was as simple as most recipes, and it resulted in a very tender biscuit due to the addition of yogurt.

I do want to make one more of these before all the fresh peaches have left the market. I especially love the extra crunch on the top of the biscuits that the sugar crusting creates. I do think that I will add a bit more cinnamon to it next time as I am a cinnamon fan. I highly recommend this recipe and have saved it as a favorite. I do have to say, though, that this did not dethrone the Dutch oven cobbler that we made when camping. That was so good, and I am not sure if it was the long hike before dinner, or that it was just really that good that made it taste so delicious. Perhaps some day I will make both at once and taste them side by side. Until then, try out this recipe and for an added touch of awesome, serve it hot with a little scoop of homemade vanilla ice cream!

Wednesday, August 24, 2011

Grandma Was Right

Grandparents can be a wealth of information. Mine are no exception. They always have little pearls of wisdom. Sometimes at the time I was not ready or old enough to understand what they were saying, but then I find myself in one of the situations they were talking about, and it all makes sense. When I was really young, I would tell my Grandma that when I got my license to drive I would take us out shopping. (My Grandmother does not drive you see.) She would always smile and tell me that by the time I was able to drive I would be too busy for things like that with her. It seemed kind of hurtful at the time, but she was right. I grew up and was too "busy" with things I thought were important, and I totally forgot about the shopping trip once I got that coveted license.

This situation returned to me in college when I became overwhelmingly busy. I remembered the talk and the missed shopping trip and always regretted it. When I talked to my Grandmother about it, she simply said that life was going to get busier and busier. She related that it was all part of becoming a grown-up and gaining more and more responsibilities. Your free time starts to evaporate. I am feeling that lately. I am not sure where it was that I got so busy, but lately it seems like there are not enough hours in the day to get all that I want done finished. The to do lists stretch out longer and longer, and the check offs become fewer and fewer. I have been wondering what I can do to make things run more smoothly. I have tried using an egg timer to make sure I am on task and not taking too long of breaks for lunch. I have tried to get on a schedule like a school day. I have tried electronic to do lists. I have yet to find my rhythm to successfully getting everything done. Add on this that I don't have kids yet, and it makes me feel even less accomplished.

Somewhere in here I need to find a good way of getting it all done. When I figure it out I will let you all know, and if you are the golden one who has been given this knowledge, please pass it on. Until then, I am off to bake bread for lunch, can peach jelly, make a run to the post office, water the garden, make dinner, and a bunt cake, and hopefully get to that sewing project I cannot seem to get to ever! There is more on the list, but well... I guess I should start that egg timer and get to it!

Tuesday, August 23, 2011

To Do List:

Things I HAVE to Do Today:

- Water the garden and look to see if there are seedlings or only weedlings.
- Grocery shop for staples. Need to get sugar and flour especially.
- Can those peaches. Once sugar is obtained, 22 pounds of peaches from Friday await!
- Do some bill paying.

Things I Would Really Like to Do Today as Well:

- Work on some sewing.
- Write my Grandmother... it has been far to long. (This one may move up into the other column).
- Bake bread for the rest of the week's lunches.
- Write a real blog posting.

Wednesday, August 10, 2011

Golden Gate Garden... Finally a Plot of My Own!

One of the things I have wanted most for myself lately is a garden. When we lived in Illinois before moving out to the bay in 2007, we lived in a condo. It was a great place, and while we could redecorate the inside however we liked, there was no gardening space. Sure I had some pots of tomatoes on the driveway, but that is not like digging into the ground and being able to plant just about anything you would want. My container gardening continued as an herb garden when we moved into our first place in Oakland. Once we moved into the second place, I had a balcony that I started up container gardening in again. While I did not get too great of results, it helped me to feel like I was still gardening in some capacity. Once we had to move for the third time, I lost my outdoor space to garden. It was something that I was determined to remedy as quickly as possible. While hunting for the current address, I saw the community garden for Emeryville. It was a very well organized garden all in raised beds. The plants in that garden are beautiful and well kept. I called to see if there was anyway that I could get in to the garden. There was of course a long waiting list. I placed my name on the list and was also directed to the Oakland Park District for their community gardening program. I contacted the head of the Golden Gate Community Garden. There was a waiting list there as well, but I was told to not panic as there may be a plot opening soon.

While on our trip across the country for the shuttle launch, I got the e-mail that informed me I would finally have a plot of my own! I was so excited to see where I was going to garden and meet all my new gardening mates. I had dreams of taking over a plot from someone that had a lot of great plants already established. I mean I am sure that whomever I was taking over from had to move or got to old to be able to take care of their space... right? I walked past great plots like this one that is next to mine. I saw beautiful flowers, vines of summer squashes, tomatoes ready to ripen in our late Bay Area summer of fall, and beans ready to be picked. Corn was a surprise to me in the garden, and all of it looked so good! I could not wait! Then.... I was taken to my plot and this is what I found:

Yikes! I was not quite sure what to make of it. If I pulled on one of the sections of the plot, the whole thing moved. I was not ungrateful by any means, but I know it was now going to be a lot of work to take over the plot from the neglect of the previous user. It was covered with lamb's quarters, which I have come to learn are edible and tasty to many people. To me, they were just a super invasive weed that had gone to seed all over the land. I wanted to get to work right away, but I was not ready that first day to start. It just seemed to daunting. I went back on Monday to start working on the plot. I pulled out the biggest of the lamb's quarters and the other plants that I could I worked for two hours on that first day. It seemed like it would never end. For every weed I chopped down with the machete or pulled out by the root, there seemed to be twenty more to come down. Once I got all the biggest stuff taken out, then there was all the grass that had taken root as well as some plants from the person who had the plot before.

I would take frequent breaks to inspire myself to keep going. One of the garden plots that I kept looking to for a boost was the plot directly in front of mine. The cosmos in this garden are a great shade of purple and would brighten my outlook. I would also go to the front of the garden and scope out a few ripe raspberries off of the community raspberry bushes. I would also just take a break in the shade and listen to all the hummingbirds zip and call through the trees and plants.

After two hours of work, this was the result... not quite where I had hoped but at least a good start. The biggest stuff was either cut down to the ground to get it out and prevent more seeds reaching the ground or it was taken out roots and all. There was still quite a bit of green matter all over the plot that needed to be raked out, and the most stubborn of the lamb's quarters needed to be dug out with a shovel. I decided to let it go for the day. Besides, I needed to get somethings done around the house, like making dinner! So, I put all the tools away, and I decided to tackle the rest of the job the next day.

I headed out for the plot with renewed vigor yesterday. I brought with me all sorts of seed packets, fertilizers, and bright eyed bushy tailed enthusiasm. I could see and end point in sight. I could see getting seeds into the ground! I was so excited. It should come as no surprise that when I get this excited about things, there is going to be something to put me back to Earth from my proverbial cloud nine. It was then that I met one of the other gardeners. She was a wealth of information and a great person to talk with and bounce off ideas. It was then that I came to the conclusion that I would not be planting anything today except weeds. Yes you heard that right, planting the weeds. My new gardening mentor explained that since the lamb's quarters had gone to seed and had seeded itself into the plot it would be better off to put my seeds for a week. I should turn over the plot, rake it, and then water it as though I had planted. As she told me she once heard from a gardening mentor: One year's seeds is seven years weeds. I am sure she is right on this one.

So while it seemed kind of disheartening to put off my planting for another week, it is a much better overall plan to let these seeds come to germination and then weed all the plot at once. That way I do not have to make sure I am only taking out weeds and not my seedlings. I set to turning over the plot. It was rather difficult as the grass and weeds had made quite the mat of roots to bust. Once I got all the dirt turned over and broken up, I raked it out to a even bed, and then raked one more time to remove any little clumps of root balls or more of the lamb's quarters stumps. I did find a few carrots, beets, and radishes that were left over from the previous plot user. Once it was all said and done, I soaked the plot well and crossed my fingers that I can get quite a few of these seeds out using this technique. I left for home feeling sore and ready for lunch... also rather sunburned. Next time I will remember the sunscreen and a shirt that actually covers my back fully rather than one that I think covers my back. You would think I would have learned this lesson by now! Look for more updates from the garden as I learn about four season growing, something new to this former Midwesterner. Till then, happy growing if you have a garden to tend or happy dreaming if you are still awaiting a plot of your own.

Tuesday, August 9, 2011

Month of Vacation

So for the month of June, I kept alluding to the upcoming vacation that the hubby and I were taking. We finally took off for our vacation at the beginning of July. We headed out on a cross country road trip to see the last shuttle launch of Atlantis. It was a long road trip from California to Florida. I called it our coast to coast to coast trip. Since we have decided to no longer fly due to currently TSA policies, we have had to make some decisions on how we are traveling. This time we chose to drive, and it was overall a very eye opening, but fun trip. We would drive at least twelve hours a day in order to make it in time to see the launch. The days were long, but we would break up the monotony with my afternoon news reports reading the news aloud as well as reading about different topics that we would wonder about. I read about everything from armadillos to Saltair to The Thing?. Don't click on that last one if you love roadside attractions and don't want the I-10 The Thing ruined for you. The biggest stand out of the trip out was the great food at Peck's Seafood in Slidell, Louisiana. We tried our best to support as many local and small businesses on this trip as possible. Many of our meals were at small mom and pop type places or out of our cooler rather than going the usual fast food route. The food at Peck's was amazing and huge. The staff there was super friendly and attentive. My big favorites there was the crab and corn chowder as well as the oyster po boy. The shrimp platter had more food than you could shake a stick at. It was a great place, a little ways off the interstate but well worth the side trip for some good fried seafood.

Finally we ended up in Titusville the day before the launch, and we had to go to bed early. The wake up call for us on launch day was 2:30 in the morning. We needed to be at Kennedy Space Center at 4:00 am, so we made our lunches and headed out for the day. The trip out took only 50 minutes. Once we got to the center and headed through security, our next stop was to get on a bus tour. We got on one of the last bus tours for the day. It was neat to see the buildings in the dark all lit up with flood lights for the launch. The vehicle assembly building definitely gave me shivers as we drove past it. We went out to the Saturn V center to see the rocket (pictured above) and the control center. I have to say that aside from the launch and watching the sun rise over the launch vehicle from the Saturn V center, this was my favorite thing at Kennedy. It was a well done recreation of the launch sequences that used to take place out of the control room. The windows rattle, the room rumbles, and the screens on the desks show the views that each person would have seen.

We decided to just watch and experience the launch when it happened rather than try to take pictures or watch it with binoculars.I am glad that we did this. It was spectacular to watch, and I am so glad we got to be there to experience it. The light from the shuttle was so intense, and it was the best example of the difference between the speed of light vs. the speed of sound. We did not hear the sound of the launch until after the shuttle was out of sight through the clouds, around 22 seconds after the launch started. We did take pictures of ourselves in front of the exhaust trail before heading to our bus for the trip back from Banana Creek Causeway to the visitors center. I don't look too bad for having only a few hours of sleep before the early pre-dawn arrival time. It was on the bus that we realized we made the right choice to watch rather than try to capture the fleeting moment of the launch. Many people were lamenting that they saw nothing and had no pictures to show for it either. I was so glad that I saw it and love the memory of that moment.

After the launch we headed back across the country. We went to St. Petersburg, Flordia next. A quick stop was made at The Dali Museum. It was well worth the side trip. The museum has some very neat pieces, and while I wished we had a bit more time than we did, it was a nice diversion from the usual days of driving. We then went out to dinner at a great local restaurant in Maderia Beach called Walt'z Fish Shak. The staff can be kind of brisk, and the place is populated by locals, but once they realize you are there for their true seafood versus one of the many chain places, all that melts away. Make sure you arrive well before 6 pm as items from the small menu disappear soon after that time. All the fish is fresh caught that day and prepared very well. We had a great time there and headed off for the next destination. We stopped in Paducah, Kentucky for a quick quilt shop browse, and I left with some great fabrics for a few aprons before the main event, Kansas City Barbeque. This time through, we stopped at the original Arthur Bryant's. It was great, and I totally recommend that you visit the one in the industrial part of town. Looking at their smoke box was amazing. The crew there is fast and efficient, and we ate ourselves silly.

From there we headed toward Rocky Mountain National Park. That was a great camping trip. We spent three days at the park camping and hiking around the mountains. We took the Alberta Falls trail up to Lock Vale. It was a moderate hike, and it only became difficult once we hit the snow pack. We had no poles with us, so it was all sorts of hands and knees scrambling to get up to certain places. The waterfalls were spectacular as the snow was very heavy this year and the rainstorms in the area have also been plentiful. We packed in our lunch and took a leisurely six mile round trip hike. The weather was perfect, and despite my thoughts that we were going to get poured on from the rain in the afternoon, a drop never fell on us. It fell on the campsite, but not on us.

The Loch was worth the extra trip up. We originally planned a shorter hike, but we wanted to make it up to Thompson Falls. Once we learned from other hikers that the upper falls was obstructed from view by ice and snow, we decided the loch was far enough. The water was super clear, and you could see all the fish swimming by. The local YMCA camp was doing some sort of initiation rite by having the campers jump into the glacier fed water. It was cold for sure, and while I am sure the kids enjoyed it from their triumphant yells, there was no way I was going into that cold water. We made our way down for a night of star gazing back at the campsite and got to see some wildlife up and personal that night. Deer were feeding on the grass just behind our tent, and a huge male elk was also feeding at the front of the campground.

The sunsets up in Rocky Mountain were spectacular. This was the view from our picnic table one night. It was just a beautiful tapestry of clouds and color every night. From there we headed home after a two week journey. It was great. I then had five days to recover and get packed before heading off to Chaos Wars in Idaho for eleven days. That was also very fun. It is always good to get to see old friends and get some combat archery under my belt for the year. I danced at the bonfires, and was delighted to make some new friends as well as reconnect with some old ones. Now I am getting back into the swing of homemaking, and there is a lot to do. While it is a well oiled machine, starting back up from an almost month long absence is difficult to say the least. There are piles of laundry to do, rooms to clean, and equipment to store. Costumes need repair, and I need sleep to get over my usual "Chaos Cough." A lot has gone on, and new plans are in the works. Check back for more updates and a new feature to the blog hopefully starting this Friday! It is good to be back, and I cannot wait to start in on all that my mind wants to do!

Wednesday, June 29, 2011

Pickle Relish

I often make up my canning plans for the week when I am at the Farmer's Market. You never know what you are going to find at a steal of a deal. These cucumbers for instance were one of those fun surprises. I was headed out of the market after arriving rather late in the day when I spotted a stall with these wonderful cucumbers bagged up together. Sometimes at the end of the day, the stall owners will bag up produce that has not sold yet and offer it at rock bottom prices. I asked how much for the bag, and I was told one dollar. Sold! I am totally in for figuring out what to do with some extra cucumbers. I decided to try my hand a sweet pickle relish as we were almost out of our store bought jar.

One of the things I forget about pickles in general is to take into account the soak time. I made several false starts on this project, getting all the ingredients out and washing up my jars, then reading the instructions and seeing a four hour soak time. I think next year I will take a page from Ashley English and do my soak over night rather than having to wait around for it. The other thing I will consider is trying the cutting part in the blender. I did this all by hand, and I agree with my husband that the pieces may be too big. Lesson learned. I have read about successful relish being made in a blender, but I was rather leery at trying it the first time out of the gate. I cut up all my ingredients into as small as pieces as I could manage. It took a LONG time. Then, they went into the brine for a nice long soak. Finally the pickling brine was made up in the pot and the now drained and rinsed vegetables were added to the hot brine.

I got the recipe I followed out of my Mom's old Ball Blue Book from the 1960's. They refer to this as "cucumber relish" not sweet pickle relish. I did tweak the recipe in a minor way, cutting the turmeric way back because we are just not big fans of a super turmeric flavor in our pickles. I ended up with four nice jars of relish. I cannot wait to see what this stuff tastes like. It is as though we have bough the endless jar of relish since we still have not finished it, and it has been several weeks since I made the relish. I guess I will just have to take a jar with us on the camping trip and "field" test it on hotdogs fresh off the fire. Follow up on the flavor and things I would change or not change will be posted as soon as I get a good opinion on the results.

Tuesday, June 28, 2011

Summer is Here?

It has hardly felt like summer around here this year. The temperatures have been cooler than normal, and the rain has been around later than the last few years we have been here. It is in fact raining again today! Very odd for the bay area from what I understand. Under this odd set of weather, I have had a hard time getting it through my head that it is summer. One of the ways that I have tried to get myself into believing it is summer is by burying my head in camping plans. Thinking of being out in the woods in a tent makes my mind turn to thoughts of summer instantly.

I wanted to decorate a bit for the Independence Day holiday this year. Nothing big, but I wanted some little touch to further remind me that yes, in fact, it is summer. I decided to make some simple place mats for the table. We have been eating in front of the table more and more since it is no longer situated so close to the television. With the television being a floor below, it is quite a hassle to bring everything down to eat, so meals at the table have been adopted. This means that we go through table linens at a much faster rate. I thought some Independence Day themed ones would be a welcomed addition to the collection. I made these with fabrics I purchased off of Fabric.com. I have found them to be a really great company. They are helpful, and the free shipping after hitting the $35 threshold is also a nice touch. They often run sales, and the discount corner is a great place to pick up some nice deals. Overall, I find their prices to be competitive with retail giants. This does not mean that I am abandoning my locally owned shops, but they are a nice alternative to other places and carry some different things from my local shops.

I decided to go with double sided as it is the easiest option now with the serger. I did not want to work on mitering corners as this was supposed to be a super fast and fun project. If you did not have a serger, you could put the pieces right sides facing, sew them together leaving a small opening, and then tun the fabric right sides out, press, and sew your opening closed. I liked the added touch the red rolled hem added to the linens. I picked a less overtly Americana for the backside so they can be used off season as well.

Well I think I am going to take advantage of the rainy day seeing as those are my most productive. There is a birthday present that needs to be sewn up as well as some costume items for my impending Chaos Wars trip. Hopefully I get all these things done before I have to leave! There is always so much to do lately... I love it!

Monday, June 27, 2011

Refresh, Restart, Reorganize

Short but sweet posting up for you today. I am currently looking forward with great anticipation both my vacation with the husband as well as my attendance at Chaos Wars. I am in dire need of some refreshment from the daily grind. It is going to be nice to break out of my usual routines and get out of the city. There are times when the city seems too closed in, and I long for some open space and a large canopy of trees overhead rather than buildings.

There is so much to do, and it seems like so little time. I am currently redoubling my efforts to get in shape for the event so that the 5000 foot altitude does not wipe me out quite as fast as it usually does. That takes a big chunk out of my day, not that I am complaining, just explaining. I am glad to be restarting on that part of my life again. Running went by the wayside during the winter due to the rain, and it kept off my plate due to the extended rain that we had this year. I am back at it now and enjoying myself very much. I just hope I can keep up the training while we are traveling.

Last but not the least by any means is the big kitchen reorganization project. The kitchen is the one place I need to get working immediately once we move into a new place. It truly is the engine room of our house, so when we moved this winter, I went about making it functional as fast as possible. Just because it was functional does not mean it is efficient. That is where the great reorganization comes into being. The pantry of this particular place is very unfriendly to anyone who cooks a great deal. We have one of those long thing pantries, with a small set of double doors, not enough shelves, and no pull out drawers. Essentially, if you want something toward the back of a shelf, you have to take everything out and put it on the counter until you can get back to the thing you need. Then, you need to take everything and put it back into the cabinet to regain the counter space to be able to cook. Forget an ingredient? Start the frustrating process all over again. Add on top of this design issue my massive amounts of canning, well not massive by most canner's standards, but massive by non-canners, and you have a recipe for disaster. So, for the past few weeks, I have been thinking and plotting and planning with my husband for how to redo this mess. I think we are in the beginning stages of a breakthrough, but it is hard to say as there is stuff all over the kitchen. Jars of jelly, pots and pans, live currently side by side with baskets of dried fruit. The chaos is maddening, and I feel like I cannot get anything done in the house with the kitchen all ripped up like this, but the end is near. The only way to get done is to go through, and that is what I am in the midst of doing. On that note, I guess I should try to tackle another shelf!

Friday, June 24, 2011

Tea for Two... or Four

One of the projects that I completed in my time off from blogging was this wonderful tea set for one of the niece's birthdays. It was super fun to make, and while rather time consuming due to all the parts and pieces, it turned out beautifully. Hopefully my sister is not ready to string me up by my toes for invading their house with yet another toy with a million pieces. What can I say, I love felt toys and cannot stop myself once I get started on them. This project was inspired by my niece's love for all things girly and dress up. Her favorite colors of pink and purple are all over this set made just for her.

I got the main idea from the ladies over at Prudent Baby. I like the concept of the tea set that could be folded up in itself for storage. I found the cupcake fabric and purple dot fabric at the store and set to work. The sewing itself was rather straightforward and easy to do as their tutorial is very thorough with easy to follow directions. I did, however, use the serger to put together the double sided place mats as well as edging of the napkins. It was just easier on me to do it that way, so I did not have to iron under any of the seams. The rolled edges also gave it some contrast which I also liked.

In order to dress up the napkins more, I added a little applique style decoration. I used up some of the scrap from the cupcake fabric to add a little cupcake detail to one of the corners. Once I cut out the circles from the cupcake fabric, I simply zigzag stitched at an almost zero stitch length to cover over the raw edge. Doing this type of satin stitch in a circle can be challenging. Just go slow and take your time as well as perhaps adjust the bobbin tension a bit to ease around those curves. I liked this better for my personal project. It tied the whole thing together in a project specific way.

The tea set pattern was purchased from Ume Crafts on Etsy. She makes great felt food patterns that are just too cute to pass up. I have done several of her patterns, and this was just as high quality as the others. The only draw back to this pattern is the tea box. My nieces and nephew apparently really wanted a working lid on this. It resulted in much dismay when they could not put the tea bags back into the box. I don't think this is anything against the pattern, just a thing to consider if your particular tea party goers want super realistic functioning tea storage. I thought the tea pot was going to be difficult to put together, but it was just as easy as can be due to the wonderfully written directions. The set looks beautiful, and I love how it looks like a real grown up set versus the usual cartoon looking ones.

The other option about this set that is fun is the reversible sides. If the pink cupcake table cloth is too much for you on a particular day, flip it over and you have a more calm purple side. Then, you can flip over the place mats for a touch of the cupcake goodness. It makes the entire set look like a new toy, and I hope that keeps the kids extra busy with combinations of the colors and settings. This tea set also seems to have brought out the old cakes and even the sushi set that I made out of felt for the girls a few years ago.

Going with the princess and dress up theme, I made sure to add one more thing to the table, crowns and wands. I found these on the site of Lu Bird Baby. I tried to make sure that I had a color for everyone. There is green for the oldest as that is her favorite color, pink for the birthday girl, purple for Mom as I am sure she will be invited, and even this blue set for the younger brother or Dad. I was sure all would be roped into tea parties and wanted to make sure everyone had representation in the crown and wand category. The tutorial over at Lu Bird is also very easy to follow. This was a fun quick project that let me use up all sorts of odds and ends of saved ribbon.

All of these things can then get folded up into the table cloth that becomes a gigantic bag. The only drawback of the drawstring bag is the ribbon drawstrings. In order to make the strings long enough to gather up the whole cloth, they end up being way too long for practicality. Very whimsical, but also not super practical for the kids to use alone. Typically when putting this all away adult assistance is needed.

Overall I think this was a great project. The level of all the sewing/crafting on this is easy with a moderate for the tea set itself. The cutting level on this project is intense. I was very happy to have the Klick-n-Kut for this one. It makes felt crafting so much more fun due to not having to cut out all those little pieces. I hope this inspires you to put together something fun this weekend.