



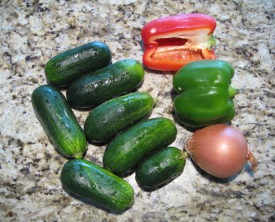
 I often make up my canning plans for the week when I am at the Farmer's Market. You never know what you are going to find at a steal of a deal. These cucumbers for instance were one of those fun surprises. I was headed out of the market after arriving rather late in the day when I spotted a stall with these wonderful cucumbers bagged up together. Sometimes at the end of the day, the stall owners will bag up produce that has not sold yet and offer it at rock bottom prices. I asked how much for the bag, and I was told one dollar. Sold! I am totally in for figuring out what to do with some extra cucumbers. I decided to try my hand a sweet pickle relish as we were almost out of our store bought jar.
 One of the things I forget about pickles in general is to take into account the soak time. I made several false starts on this project, getting all the ingredients out and washing up my jars, then reading the instructions and seeing a four hour soak time. I think next year I will take a page from Ashley English and do my soak over night rather than having to wait around for it. The other thing I will consider is trying the cutting part in the blender. I did this all by hand, and I agree with my husband that the pieces may be too big. Lesson learned. I have read about successful relish being made in a blender, but I was rather leery at trying it the first time out of the gate. I cut up all my ingredients into as small as pieces as I could manage. It took a LONG time. Then, they went into the brine for a nice long soak. Finally the pickling brine was made up in the pot and the now drained and rinsed vegetables were added to the hot brine.
 I got the recipe I followed out of my Mom's old Ball Blue Book from the 1960's. They refer to this as "cucumber relish" not sweet pickle relish. I did tweak the recipe in a minor way, cutting the turmeric way back because we are just not big fans of a super turmeric flavor in our pickles. I ended up with four nice jars of relish. I cannot wait to see what this stuff tastes like. It is as though we have bough the endless jar of relish since we still have not finished it, and it has been several weeks since I made the relish. I guess I will just have to take a jar with us on the camping trip and "field" test it on hotdogs fresh off the fire. Follow up on the flavor and things I would change or not change will be posted as soon as I get a good opinion on the results.
 On Monday this week I went in for my first attempt at a mock mincemeat recipe. Mincemeat was something we got to have at Thanksgiving around our house. It was made out of the green tomatoes that were left over from the summer. It was a wonderful filling for a pie; green tomatoes that should not be wasted combined with dried fruits, lots of spices, sugar, and some suet. Since I could not find green tomatoes last year at our usual market, I made plans to make this pear version of mincemeat. After my canning plans were made, I ended up finding lots of green tomatoes at another market I have started to attend, but I thought I should stick to the pear plan.
 One of the big advantages of doing this recipe is the lack of suet. Suet is a beef fat that would take the recipe into the realm of pressure canning, which, for now is not an option due to my lack of a pressure canner. Another added benefit was the use of pears. Some people love mincemeat until they find out it is made from tomatoes. I know there are tomato sensitive people out there, so this is much more crowd friendly. The dried fruits I used in this recipe were currents, golden raisins I dried in the dehydrator here, and some dried apricots that I finely chopped up. It made me feel all warm and excited for the family fruitcake this winter!
 Next went in the spices. The recipe I used from the Ball Complete Book of Home Preserving called for cinnamon, nutmeg, and ground ginger. I debated exchanging the nutmeg for already ground mace, but I stuck with the nutmeg. I thought I should try the recipe as is for one year and then start tweaking. This recipe also called for brown sugar rather than a white sugar. This seemed to lend a nice warmth to the mincemeat. It smelled just like the holidays around the house.
 Next came the peeled, cored, and cut pears. This took what seemed like forever. I wanted to make sure the pieces of pear were not too big as I will be making this into mini-pies for the two of us. Big fruit does not work that well in mini-pies. It works even less in the pocket pie mold I got from a kitchen store. After the pears were folded in, it was time to cook the mixture down. It made the house smell even better. This was one of the first recipes I have made for canning that I could not help but taste periodically during the cooking.
 The taste was rich and layered. Everything a person looks for in holiday cooking was in that pot. I cooked it all down until it was a pretty solid mix with little liquid. From there I went to the canning process, and after 20 minutes in the water bath, I had four pint jars ready for pies, tarts, or pocket pies later this year. I am so excited by this recipe and cannot wait to crack a jar open. I decided to hide them in the pantry hoping that out of sight out of mind will work. I think that I will make up one of the mini-pies for a change of pace this year at Thanksgiving along with the usual pumpkin pie that I always make.
  Sorry for the radio silence on the blog as of late. I have been super busy with commitments and blogging has not fit into the schedule as I had hoped. The seasons have drastically changed here. We went from a super chilly summer into a couple of short lived heat waves after summer was officially over. Then, the temperatures around here dropped like a rock and the rains returned to the San Francisco Bay area. This weekend is supposed to be rainy just like last weekend. This rainy weather is not met with worry though as I have jars of sunshine to get me through the winter months.
 A while back, one of my acquaintances blogged about buying a house and acquiring a new lemon tree. She was looking for things to do with all the lemons. She also was looking for some canning lessons. I traded her canning lessons for some lemons, and out of the trade came not only a great friendship, but also these awesome jars of strawberry lemonade concentrate. She had made some of this as well, so I had her notes to go off of for tweaking mine. I used the Ball book that I have for a recipe, and she got her's off of the internet somewhere. In her recipe, she said that the concentrate ended up being way too sweet even when watered down. This was good to know, so I cut my sugar levels by quite a bit. I like lemonade to be a bit sweet but not cloying by any means. I also strained my strawberry pulp, as Dan is not a big fan of the seeds in strawberries. This extra step took quite a while and also cut the yield I had on strawberry pulp by a bit.
  I ended up with four pints, one from Dreah and three of my own, to take me through the winter. I had a little left over that I placed in the fridge and recently got out to test. It was quite good. The mix of the different types of Meyer lemon and regular lemons made for an interesting lemon flavor that was not too harsh. The strawberry flavor was a nice enhancer but was also not overwhelming. The sugar being cut down was also a good move as it was just the right amount of sweetness for me, and if someone else wants it more sweet, they can always add more to their glass. I think this could also be great as a daiquiri or margarita base if one wanted to use it that way or it could be cut with lemon lime soda or club soda as the Ball book suggests. Needless to say, I will be trying to get more lemons from my friend next year to make this one again! Now off to work on those perplexing socks I am trying.
 One of the things that I used to really love about fall in central Illinois was the trips to the local apple orchard. When we were there, we would always pick up jars of their apple butter as well as a jar or two of pumpkin butter. For a birthday gift for Dan one year I even had it shipped out here for him - a much too expensive solution for our long term pumpkin butter needs. I decided to try my hand at it this year. Since it was a spur of the moment decision, I used canned pumpkin rather than doing it from scratch. From scratch is definitely a future goal.
 I guesstimated out how much of the spices and sugar to use. In the end, it was not enough for our liking. Once I have the recipe down, I will share it with you all. I think that more sugar would have made this batch much better. As it was, the pumpkin flavor was good but not sweet enough for a butter. The cloves and cinnamon amounts seemed correct but having to use powdered ginger over fresh was also a big disadvantage. I am also contemplating replacing the fresh ground nutmeg with some mace to kick up the nutmeg flavor in the butter.
  I mixed all the ingredients and put them into the mini-slow cooker that came with our big one. This mini slow cooker has always done a good job of keeping appetizers warm for parties, but would it actually cook down the pumpkin into a butter? We plugged it in after dinner, and I wondered how many hours it was going to take. The recipe I was working off of made it sound like this would take several hours - around 10 or so. I was wondering if this was just too long of a time or not, so I placed the lid with a vent on the mini cooker and watched a movie coming back to the pot to stir every now and then.
 The mini slow cooker worked very well, actually too well. Too much of the liquid cooked off for our liking after only five hours. It made for an extremely pasty butter. I was slightly disappointed in the results and wished I would have watched the cooking better than I had. It also tasted good, but it was not an exact match for the one I was trying to mimic. A tasty first try to be sure but not the last try. I suspect that I will be making more of this during the fall and winter months.
 From one can of pumpkin, I got two half pints of my butter experiment. Now I know that there are differing opinions as to water bath canning versus pressure canning, vs freezing of pumpkin purees. I decided on just freezing mine. I am very much a safer than sorry kind of person and tend to want to follow the guidelines on this kind of thing. One of the reasons they recommend only freezing pumpkin is the viscosity of the puree makes it hard for the heat to fully penetrate the jars, and with how thick this butter turned out, I believe them. Another thing that I have read is that pumpkins have a very inconsistent pH level and therefore it is hard to pin down processing times. Who knows? I not being a food scientist have decided to err on the side of caution and just freeze it.
  One of my favorite things about going to my Uncle Glen and Aunt Chris' house when I was a kid was the raspberry bushes. Uncle Glen hosted a huge garden for the entire family on his farm, and many weekends out of the summer were spent there picking beans, sweet corn, beets, potatoes, zucchini, carrots, and apples. My favorite things, besides the gigantic pumpkins he grew for Halloween, were the raspberry bushes.
  Boy do I miss those free berries! I splurged this year and decided to make some seedless raspberry jam for this year. There were raspberries on sale at the store, and I also picked up some more at the end of the day at the Farmer's market on Sunday. I washed the berries in small batches and then put them into a pot. I then heated them through and mashed them down with a potato masher. This made a raspberry slurry that exposed just how many seeds there were.
  From there, I took a fine mesh sieve and pushed the raspberry puree through. This was a super time intensive but easy to do task. I was surprised that when I dumped the filtered juice and pulp into the pot for the cook up of the jam there were still some seeds present. They were super small, so I am not sure if they just happened to fit through the mesh or if I was a bit sloppy at some point and lost some seeds into the filtered juice.
  I ended up with four cups of juice. I added three cups of sugar and the juice of a lemon to preserve the color of the raspberries into the cooking pot. I learned when doing this jam that it reached a solid jam state two degrees sooner than my usual jams. I am wondering if I would have pulled the cherry earlier if it would have turned out. Perhaps I just cooked that jam too much which turned it into the odd texture it is.
  I ended up with three jars of jam. I put crushed red pepper into one of the jars to make a spicy and hot version of the jam. It is great for an appetizer when poured over warmed brie, baked under pastry with brie, or poured over warmed cream cheese and served with crackers. I hope that one jar of it is enough for this year. Two of the jars are plain jam, but one is going off to a friend. That leaves me one highly prized jar for myself. I am thinking about trying a recipe out of one of my canning recipe books that cuts the raspberries with apples to stretch the jam out into a bigger batch without using more berries. It sounds like an intriguing way to make this without the high cost. Things to ponder for next year, till then, I will be hiding this jar away, so I don't open it until I really need a pick me up.
 I thought I should usher in the first night of fall with an apple pie, so yesterday afternoon, I grabbed one of the jars of Gravenstein pie filling from August and went to work. I made up some pie crust quickly and chilled it while I got some housework done. From there it was as easy as pie! ;) I rolled out the dough, popped open the jar, filled the shell, topped it off, egg washed the top, cut the vents, and added some rough sugar. I thought it looked just as good as a professional pie and tasted wonderful.
 Last weekend, while my sister was visiting, I found some Concord grapes at the Friday farmer's market. They were super huge in size and very juicy. I picked up five pounds, so I could make both jam as well as some juice for later this year. It was interesting seeing people taste them at the market. Some knew what they were and expected their tart and sour taste. Others thought they were some kind of black sweet table grape. They were the fun ones to watch as their lips puckered up and comments of dislike followed.
  I love these grapes for jelly. Here I have placed three pounds of stemmed, rinsed grapes and a half cup of water into the big stock pot. This mixture is brought up to a boil and then reduced to a simmer for ten minutes. During this time, I use my spoon to separate the skins and their flesh. This results in the green "grapes" that you see in the picture and the purple skins tend to sink to the bottom during this. When they sink, it is easier to see which grapes still need to be separated, so go after those next.
 Once the mixture has simmered for the ten minutes, it should look something like this, a bright royal purple mess. There will be skins, seeds, and some still solid pulp. All of this will go into your jelly bag or jelly strainer. I let it strain for two hours, but there was still quite a bit of juice left. I stirred the pulp down in the bag for a while until all the juice was removed from the skins and uncooked pulp.
  I measured out the juice and had the four cups that I needed. My Mom's old Ball Blue book is almost always right about the weight to juice conversion as it was here. I added the three cups of sugar to the juice and started my boil. I have read in some places that it would help to let the grape juice set overnight to be able to remove the solids that contribute to crystals that can form in the jelly. I skipped this step and did not see any form when the jelly was finished. To make the jelly, cook the juice and sugar mixture to the jellying point, or eight degrees above the boiling point of water.
 This jelly did not have any foam form as well, so I got four good jars of foam free grape jelly. I was rather pleased. If you find foam on your jelly, skim it off quickly and start to fill your hot, sterilized jars. Fill to a quarter inch of headspace. From there take the jars and place them into your water bath, and process the jars for 15 minutes. Once the process time is over, remove the lid from the canner, turn off the heat, and wait five minutes before removing the jars of jelly.
 I finished with four jars of the darkest grape jelly. It is a beautiful purple black. I like that we now have the final store bought jam out of the house. Grape is Dan's favorite, and I had not been able to find the grapes until this year. Now, with the smaller jars, we can hopefully finish the jelly before it goes bad in the fridge. Somehow, with homemade jelly, I do not see finishing them up as a problem.
 I also made some grape jelly in the way my mom made it. In the hot, sterilized quart jars, add a half cup of sugar and one cup of grapes. Then, fill the jars with boiling hot water. I did find this to cause some problems. I am not sure if my mother used less sugar or if I just did not have the water fully boiling before adding it to the jars, but my jars had some residual sugar at the bottom of the jars when filled and also after the processing time.
  I think the next time I make the grape juice, I will add the sugar to the pot of boiling water and make sure it is all dissolved before adding the liquid to the jars. This will prevent the crystallized sugar from forming at the bottom of the jars like it did this time. I cannot wait for this to finally be ready. This is one of those tastes of my childhood that I miss the most. I hope that I got the sugar to grape ratio correct. I am banking on the thought that my Mom did not use the full cup of sugar that the book says you can use.
  Here are the jars after just a few days. It takes a few weeks for the juice to fully be extracted from the grapes that are canned inside of the jars. Once the juice is finally dark in color, it is time to enjoy. My Mom would crack the lids open and use them to strain out the juice from the spent grape pulp and seeds. I can barely wait to see if the juice is the same. I hope it is!



 Posts
All Comments
Posts
All Comments


