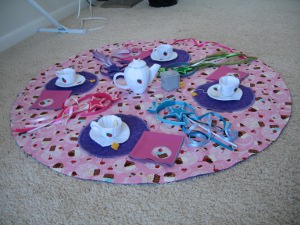
 One of the projects that I completed in my time off from blogging was this wonderful tea set for one of the niece's birthdays. It was super fun to make, and while rather time consuming due to all the parts and pieces, it turned out beautifully. Hopefully my sister is not ready to string me up by my toes for invading their house with yet another toy with a million pieces. What can I say, I love felt toys and cannot stop myself once I get started on them. This project was inspired by my niece's love for all things girly and dress up. Her favorite colors of pink and purple are all over this set made just for her.
 I got the main idea from the ladies over at Prudent Baby. I like the concept of the tea set that could be folded up in itself for storage. I found the cupcake fabric and purple dot fabric at the store and set to work. The sewing itself was rather straightforward and easy to do as their tutorial is very thorough with easy to follow directions. I did, however, use the serger to put together the double sided place mats as well as edging of the napkins. It was just easier on me to do it that way, so I did not have to iron under any of the seams. The rolled edges also gave it some contrast which I also liked.
  In order to dress up the napkins more, I added a little applique style decoration. I used up some of the scrap from the cupcake fabric to add a little cupcake detail to one of the corners. Once I cut out the circles from the cupcake fabric, I simply zigzag stitched at an almost zero stitch length to cover over the raw edge. Doing this type of satin stitch in a circle can be challenging. Just go slow and take your time as well as perhaps adjust the bobbin tension a bit to ease around those curves. I liked this better for my personal project. It tied the whole thing together in a project specific way.
 The tea set pattern was purchased from Ume Crafts on Etsy. She makes great felt food patterns that are just too cute to pass up. I have done several of her patterns, and this was just as high quality as the others. The only draw back to this pattern is the tea box. My nieces and nephew apparently really wanted a working lid on this. It resulted in much dismay when they could not put the tea bags back into the box. I don't think this is anything against the pattern, just a thing to consider if your particular tea party goers want super realistic functioning tea storage. I thought the tea pot was going to be difficult to put together, but it was just as easy as can be due to the wonderfully written directions. The set looks beautiful, and I love how it looks like a real grown up set versus the usual cartoon looking ones.
  The other option about this set that is fun is the reversible sides. If the pink cupcake table cloth is too much for you on a particular day, flip it over and you have a more calm purple side. Then, you can flip over the place mats for a touch of the cupcake goodness. It makes the entire set look like a new toy, and I hope that keeps the kids extra busy with combinations of the colors and settings. This tea set also seems to have brought out the old cakes and even the sushi set that I made out of felt for the girls a few years ago.
 Going with the princess and dress up theme, I made sure to add one more thing to the table, crowns and wands. I found these on the site of Lu Bird Baby. I tried to make sure that I had a color for everyone. There is green for the oldest as that is her favorite color, pink for the birthday girl, purple for Mom as I am sure she will be invited, and even this blue set for the younger brother or Dad. I was sure all would be roped into tea parties and wanted to make sure everyone had representation in the crown and wand category. The tutorial over at Lu Bird is also very easy to follow. This was a fun quick project that let me use up all sorts of odds and ends of saved ribbon.
  All of these things can then get folded up into the table cloth that becomes a gigantic bag. The only drawback of the drawstring bag is the ribbon drawstrings. In order to make the strings long enough to gather up the whole cloth, they end up being way too long for practicality. Very whimsical, but also not super practical for the kids to use alone. Typically when putting this all away adult assistance is needed.
 Overall I think this was a great project. The level of all the sewing/crafting on this is easy with a moderate for the tea set itself. The cutting level on this project is intense. I was very happy to have the Klick-n-Kut for this one. It makes felt crafting so much more fun due to not having to cut out all those little pieces. I hope this inspires you to put together something fun this weekend.




 Posts
Posts

