Showing posts with label recipes. Show all posts

Monday, August 23, 2010

Apple Syrup and Pancakes

Apple canning and preservation continues into this week, and while I am happy to be canning, I will be kind of glad to be done with apples soon. On Friday I dipped my toe into new territory, flavored syrup. I wanted to try my hand at making apple syrup without the addition of corn syrup to the mix. I started off by using one of the two gallon bags of apple cuttings from the freezer. To the bag of cuttings, I also added three whole apples to the pot.

I followed the same procedure as making juice for the apple jelly. I measured out the apple parts and added the proportional amount of water to the pot, brought it to a boil, and then simmered to for a full 25 minutes. From there I drained it all through the jelly bag. This time, it was quite a bit more substance in the bag with less juice since I used mostly peelings and cores and very little overall flesh. Also, I missed the jelly bag a bit when emptying the pot. I had to run the juice through another mesh to make sure I got all of the solids out of the juice.

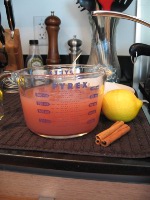
I got around three cups of juice out of the cuttings and a few apples. It was more than I had hoped for, and the experimentation was on. I looked over several recipes from my books and settled on a method rather than an actual recipe over another. I picked a couple of good cinnamon sticks to add to the syrup and also lemon juice for color and acidity boosting. From there it was crossed fingers and hopes for a good result.

I made a sugar solution and then cooked it until I made a very thick syrup. I brought the sugar syrup to just under the soft ball stage of heating, 230 degrees F or 110 degrees C. (You may have to adjust for altitude depending on where you live.) This seemed like a rather dicey operation as I loathe sugar burns, and I was not too sure how the introduction of the room temperature apple juice to the super hot sugar syrup would react. I added in the cinnamon sticks first to cook for a bit and to loosen them up a bit for the short cooking of the syrup. Next, I slowly but constantly added in all the apple juice.

From this point, I brought the solution up to a boil again over high heat. I boiled this all together for five minutes, stirring occasionally. I then removed this from heat, added the juice of a lemon, and then I commenced the canning. I processed the jars for 10 minutes with a 1/4 inch head space. We opened one jar right away on Saturday morning to see how it all turned out. I was really pleased with the flavor of the syrup. It was not too sweet, and the apple flavor was the main star with cinnamon playing a supporting rather than starring role. I think that the next time I make this I would definitely cook the apple juice and syrup mixture together longer. I think the extra cook time would have helped make it more solid and a bit less runny. It was overall a great first attempt I think.

We ended up with five half pints of the syrup. It was great over apple pancakes with whipped cream and some extra cinnamon. I also plan on using it as a topping for apple cinnamon ice cream or it could be used to soak pieces of sponge cake or angel food cake in for a quick fall flavored dessert.

No Corn Syrup Apple Syrup
3 cups of apple cuttings
3 apples, washed and rough cut with only seeds removed
2 cinnamon sticks
2 1/2 cup sugar
5 cups water separated
1/8 cup lemon juice

To Prepare the Juice Using cuttings from apple canning earlier in the week and a few whole apples to equal 3 cups of apple parts or starting with fresh apples, select about one fourth under ripe and three fourths fully ripe tart apples. Sort, wash and remove stem and blossom ends. Do not pare of core. (I do remove all the seeds though.) Cut apples into small pieces. Add 3 cups water, cover and bring to a boil on high heat. Reduce heat and simmer for 20 to 25 minutes, or until apples are soft. Extract the juice using a moistened jelly bag. This takes around 2 hours. If you want a clear juice, do not squeeze the bag. For clearer juice, refrigerate the overnight and skim off any solids that are in the juice. If using fresh apples, keep solids from the jelly bag to make apple butter.

After the juice is extracted, prepare canner jars and lids, In a clean stainless steel saucepan, combine sugar and water. Bring to a boil over medium-high heat stirring to dissolve all the sugar. Cook the mixture until it creates a syrup and reaches the temperature of 230 degrees F or 110 degrees C, adjusting for altitude. Add cinnamon sticks to the mixture and cook for a minute. Slowly and constantly add the apple juice to the sugar syrup. Return to a boil and boil for 5 minutes or until a thickness you desire. Stir occasionally. Turn off heat, add lemon juice. Ladle hot syrup into the hot jars. Leave 1/4 inch headspace. Place jars in canner and process for 10 minutes.

This yielded 5 half pints when I tried it.

I will see how the syrup reacts over time to both being refrigerated as well as shelf storage. I am not sure if it will thicken any, but it was super tasty. I doubt there will be much time to watch it on the shelf as I am sure it will be eaten fast.

Friday, August 20, 2010

Brandied Apple Rings, Apple Jelly and Butter Recipe

Yesterday was a whirlwind of activity, with tutoring starting again and house straightening to be finished, I managed to squeeze in a some quick canning. I decided to try out a recipe for brandied apple rings this year. I cut down the recipe considerably as I wanted to see if I would like this at all before making big batches of it. I selected out the prettiest red apples for this recipe as the skins are left on the apples.

After a good scrub, it was time to slice them into rings on the v-slicer and a quick dip in lemon water to keep the slices nice and white. I also use an apple corer to get perfect circles cut out of the centers. I do have to go back sometimes to clean up sides of seed casings that are left behind, but I try to maintain a rounded shape as best as I can. I thought these turned out very pretty. Then it was time to cook them in a sugar solution. I did this following the recipe, and I am not sure if the apples have become too soft or if they are just not a good fit for the recipe but they started to disintegrate after only 7 minutes in the syrup. They were supposed to cook for 15 minutes.

I took quick action and just started loading up the jars before I had nothing left. I then added the brandy to the sugar syrup, added it to the jars, and capped them off. Then it was into the water bath for processing. I think they turned out very pretty with the red color that naturally permeates through the jars. The recipe said you could add food coloring if desired, but I kept them plain to see how things naturally would develop. I hope they taste good, but for now, they look pretty and will be an interesting surprise for a later day.

As promised, I am going to post the recipes I use for apple jelly and butter. Please make sure you follow proper canning techniques when making these recipes, including processing finished products as well as maintaining the proper sanitation needed for safe canning.

Apple Jelly
4 cups apple juice (this takes about 3 pounds of apples and 3 cups of water)
2 tablespoons strained lemon juice
3 cups sugar

To Prepare the Juice Select about one fourth under ripe and three fourths fully ripe tart apples. Sort, wash and remove stem and blossom ends. Do not pare of core. (I do remove all the seeds though.) Cut apples into small pieces. Add water, cover and bring to a boil on high heat. Reduce heat and simmer for 20 to 25 minutes, or until apples are soft. Extract the juice using a moistened jelly bag. This takes around 2 hours. If you want a clear jelly, do not squeeze the bag. For clearer jelly, refrigerate the juice overnight and skim off any solids that are in the juice. Keep solids from the jelly bag to make apple butter.

To Make Jelly Measure apple juice into a kettle. Adjust proportions of sugar to juice if necessary. Add lemon juice and sugar and stir well. Boil over high heat to 220 degrees F,if you are at higher elevations to 8 degrees above the boiling point of water, or until jelly mixture sheets from a spoon. Remove from heat, skim off foam quickly. Pour into prepared and sterilized jars leaving 1/4 inch head space. Seal and process for 10 minutes in water bath.

Yields 3 to 4 eight ounce jelly jars.

Recipe amended to take into account higher elevations. Also look at the comments section below for my comment to learn an easier way to test for the set of jelly rather than the sheeting from the spoon.

Apple Butter

2 quarts of cooked apple pulp
4 cups sugar
2 teaspoons cinnamon
1/4 teaspoon ground cloves
dash of allspice

Use apple pulp left over from preparing the apple jelly. Run the pulp from the jelly bag through a food mill or fine sieve to remove seeds, skin, and seed casings from the pulp. Measure the pulp and adjust sugar and spices proportionally to the pulp measurement. Add sugar and spices. Cook on medium low until the flavors are well blended, about 15 minutes. To prevent sticking, stir frequently as he mixture thickens. If the butter gets too thick for your liking, you can add a small amount of apple juice or water to thin. Pour hot apple butter into hot, sterilized jars leaving 1/4 inch head space. Process pints and half pints for 15 minutes in water bath.

Yields about 5 pints.

Tuesday, May 18, 2010

Coconut Cake!

The last week and weekend was a busy one. My parents came to visit from Illinois, and it was a fun time. They arrived on Thursday, and after finding out there was water in the basement back home, we tried to relax and have fun. I made homemade gyros and pita breads with a nice Greek salad while my Dad tried to find an earlier flight home. For dessert I made the chocolate strawberry pie recipe of my sister's.

On Friday, we went and leisurely walked around the Union Square area after a great dim sum lunch. It was fun doing some window shopping, and my parents picked up some kitchen items to take back with them. I managed to be good in all the kitchen supply places but broke down and bought myself two shirts. They are super comfortable and look great. On Saturday we went wine tasting in the Santa Cruz mountains. It was a fun trip, and I really enjoyed myself. Most tastings were free, and most of the wineries were small and very intimate. I enjoyed the small family run ones the most. Dan and I even bought six bottles of wine along the way.

On Sunday, we dropped off my parents at the airport and started working on cleaning up the house and resetting ourselves for the week. There was laundry to do as well as picking up all the items that were left around by myself during the whirlwind of activity of the visit. Now the chocolate strawberry pie is not Dan's favorite. He is a huge fan of coconut though, so I decided to make the coconut cake that we saw on a recent episode of America's Test Kitchen. Currently you can get the recipe on their website for free. If you are interested, I would go and get the recipe now before it goes away from being a free one.

It was a really easy recipe and only required two odd items, coconut extract and creme of coconut. They are both available at most local grocery stores. This cake was the official final nail in the coffin for me with boxed cake mixes. This took just as much time to make as a boxed cake, and the results are just so much better. I had made boxed cupcakes recently, so it was a good comparison in texture and flavor between homemade and boxed. The texture is just so much better. I also tested all the items one by one as I was making them. The low sweetness of the cake balances out the very sweet frosting. The toasted coconut is also a great texture on top of the whole package. I cut this recipe in half successfully for one of my mini cakes, and it halved easily with wonderful results. The only adjustment I would recommend is cutting the time used to toast the coconut. I had to cut my toasted with some raw because it was all too well done and not enough raw. Now, I just need to find something to do with the saved egg yolks. Any ideas?

Today I am off for a five mile walk since I could not yesterday due to the rain. I am also hoping to finish up the olive filigree pants that I started yesterday. They are coming along beautifully. I am hoping that I can finish them today and get them photographed tomorrow, but they are predicting rain again. I guess that means more sewing if I cannot photograph to list. Well I am off for that walk. I cannot wait to test out the new walking route and see if it is exactly five miles. I am also timing myself to see how long I take. I would ideally like to take less and less time each walk. Here is to getting in shape to continue eating cake!

Thursday, May 6, 2010

Cheater Cream Puffs


As I talked about yesterday, I love desserts. Cream Puffs are up at the top of the list. I used to beg my Grandmother to make these for me, and when I was a kid I was sure they were so hard to make. Once I headed off to college, I asked for the recipe from her, and I found out that they were really not all that hard to make. I did not think about blogging this recipe until after they were in the oven, so there are not many pictures of the early steps. I apologize for that. Hopefully from descriptions alone I can walk you through the process. Why do I call these cheater cream puffs? Well they are filled with instant pudding, so no need to be a custard making master for this recipe. They are fast to make and easy too. It makes for a quick midweek dessert. So, without further ado, here is the recipe for cheater cream puffs!

Ingredients:

~ 1/4 cup butter
~ 1/2 cup water
~ 1/2 cup flour
~ 2 eggs at room temperature (this is important)
~ Your favorite cook and serve pudding. I usually use vanilla. I think it turns out best
~ Semi-sweet chocolate chips

Let the eggs sit until they reach room temperature. Preheat the oven to 450 degrees. Heat the water in a saucepan until boiling. Add the butter, reduce the heat to low, and melt the butter. Add the flour and mix until it is fully incorporated. Remove the pan from the heat and add the eggs one at a time, making sure to fully incorporate them. The dough should be really thick and putty or pasty like. It will also be a lemony color. Place the dough by the spoonful on a parchment lined cookie sheet. The dough should make six full sized cream puffs. Make sure to pat down any tall peaks in the dough. I am not sure if you can make mini cream puffs with this seeing as I have never tried. If you do try it, let me know what you find out about the cooking times. Bake the cream puffs in the 450 degree oven for 10 minutes, and then reduce the oven temperature to 400 degrees and bake for an additional 25 minutes. When they are done they should look like this:

While the cream puff shells are baking, make your favorite filling. I typically use Jello brand vanilla cook and serve pudding. Once I cook it, I make sure to pour it into a bowl and cover the top with plastic wrap so the skin does not form on the pudding. While I love pudding skins, I need all the pudding that little box provides for the filling for these shells. Make sure to cool the pudding completely. When you are ready to serve them, slice them in half with a serrated knife. The interior should be rather hollow. If it is not, you can just push the middle out to make it hold more of the filling. Fill with pudding. If you like a chocolate top like I do, melt some semi-sweet chocolate chips in the microwave and spread on the top of the cream puff. Simple and easy! Make sure that you do not fill the puffs until right before you want to eat them otherwise they will get soggy and not be pleasant to eat. You can keep uneaten shells in a plastic bag for a few days before they get stale, but I am sure they will be gone well before then!

Friday, September 25, 2009

Applebutter Recipe

I had a comment on my apple fair entry asking if I ever got my sister's apple butter recipe. I in fact did, and while I answered in the comments area, I thought I should also post up the recipe here. I hope you enjoy it!

My Sister's Apple Butter:

Ingredients:
4 pounds of apples, peeled, cored, rough chopped
2 cups apple cider
3 cups of sugar, less if your apples are really sweet
2 tsp. cinnamon
1 tsp. cloves
1/8 tsp. allspice

Directions:
Place cut apples, cider, and sugar into a crock pot on high for one hour. Turn to low setting, stir, and crack the lid keeping it open with a wooden spoon or similar item. This should allow the steam to evaporate out of the crock pot. Cook on low for around 10 hours, stirring around every once in a while. I cooked mine overnight. Cook until it is reduced to a very thick sauce like consistency. Using a stick blender, blend up the butter until it is like baby food rather than extra chunky applesauce. Add spices to the butter and cook one more hour on a high setting. Pour into properly prepared half pints. Process for ten minutes in a water bath.

I hope you like it, and it works for you!