
A few years ago, my husband and I went to visit friends up in Minnesota. During our visit, we had tea in the afternoon as is habit around their house and with me as well. One thing I noticed when we were there was the beautiful tea set they used. In order to keep the tea warm, they used a tea cozy for the pot that did not fit with the rest of the matched pieces. I decided then to be on the look out for some fabric that would match to make a tea cozy for them. I finally found it and decided to make a tutorial to go with my making of this surprise gift for them. So, without further adieu here is my tutorial with notes on how I would have improved the project if I make one again in the future
Tea Cozy Tutorial
Materials needed:
~ ruler
~ scissors and if you would like a circular cutter
~ circle cutter or 6.5 inch circle template
~ 3/4 of a yard of cloth
~ something to make your pattern with, I used pattern ease, you can use paper or interfacing as well
~ needles and pins
~ marking pencil
~ button or velcro
~ batting or fiber fill

First, prepare your fabric by washing and drying it according to the care directions. This not only helps to prevent shrinkage of the finished project but it also helps to remove the finishing chemicals that may remain on the fabric. Next, make your pattern pieces. I was trying to guestimate the right size for the cozy, so I made the bottom a 6.5 inch circle, so it would have a half inch seam allowance built in. The side pieces are constructed like an arch way. The bottom of the arch I made was 10 inches. The height of the arch at the highest point was 8 inches. I made the straight side portions four inches before I began the arched top. I drew this by hand and eyeballed what I thought looked right, then folded the piece in half and cut them to be exactly the same on both sides to eliminate any differences in the curves.

Next, I placed my pattern piece over the fabric to see if I had designs that I liked on the outside pieces. You will need to cut four side pieces over all. If you wanted, you could use plain colored cotton on the inside, but I decided to just use the same material for the inside and outside.

After you have the four side pieces cut, you will need to cut two circular bottom pieces. I used a circle cutter, and I highly recommend spending the money to get the Olfa circle cutter. I don't know how I got by with out it now that I own one.

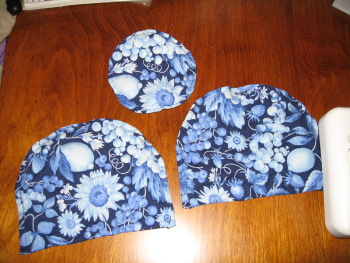
Here are my pieces grouped together. I am showing the outsides, or the pieces that will be seen when the cozy is assembled. I chose to put pieces of the fabric that had more bright highlights on the outside, and the dimmer pieces to the inside. NOTE: if you are using batting, you will need to cut two side pieces and one bottom piece of that now as well.
Next, place the pieces right sides together. Do this for the bottom and both sides. NOTE: IF you are using the batting, place the batting on one of the wrong sides of the fabric for the side pieces and the bottom as well. Pin the pieces together.

Sew the side pieces together starting with a quarter of the flat bottom side, up the straight edge side, the curved edge, down the other straight side, and part way across the flat bottom side, leaving three or four inches open in the middle of the bottom edge. I used a quarter of an inch seam allowance for the side pieces. Make sure that you pull the pins out before they reach your needle on the machine.

Clip the curved edge so that it will lay flat when turned right side out. Make sure that you also do not clip too close to the stitching so that it does not pull though the stitch line. Repeat these steps for the other side. Also, sew the bottom in the same manner, leaving an inch or so open so you can turn it right sides out. For the bottom, I used a half inch seam allowance. NOTE: in the picture below, I did not sew the bottom as you should. Please do make sure that you sew the bottom edge leaving a three or four inch opening in the middle for turning the piece right side out.

Turn the pieces right side out and iron them so the seams lay flat.

I top stitched the pieces in a darker color thread as decoration. I did a fourth of an inch seam on the sides. IF YOU ARE USING FIBERFILL, DO NOT TOP STITCH THE BOTTOM OF THE SIDES PIECES AND DO NOT TOP STITCH THE BOTTOM CIRCLES YET.
If you are using velcro, just sew one side of the velcro to the inside of each side piece of your cozy. Make sure that they will line up with each other.
If you are using a button, measure one side piece to find the middle. From there make a marking that will be big enough for your button to fit through, making sure that you center the mark on the center line of the side.

Sew in your button hole either by hand or machine.

If you used batting, skip this step and the next step.
IF YOU ARE USING FIBERFILL stuff the sides and bottom so that they are slightly full, but not bumpy. In the next picture, the bottom is totally open on my sides. This is something I learned in making my cozy that was not really necessary. I ended up needing to slip stitch the entire bottom of both sides closed. If you leave just a small, 3 or 4 inch opening, you can stuff the sides easily and not have to do as much slip stitching. Stuff the bottom circle piece as well. Once the sides and bottom are stuffed, I then pushed down on them to try to flatten out the fiberfill as much as possible to take the loft out.

Turn the edges of the opening under and pin. Slip stitch the openings closed. If you want, now you may top stitch the bottom of the sides and the bottom circle.
Now that your pieces are filled with either batting or fiberfill and are all turned right side out and top stitched if you want, now is time for the quilting. I found trying to hand quilt my pieces that I filled with fiberfill was nearly impossible, so I opted for machine quilting. Feel free to try hand on your pieces or machine. Really do whatever is most comfortable for you. I used a slightly lighter blue thread to outline the fruit and flowers. It took a little doing to get over some of the thicker areas of the fiberfill, and I think I would try a thick batting next time, but the fiberfill really did work fine, and I did not want to buy a package of batting just for this project.
Next, with right sides together, whip stitch the bottom to the side pieces. I had an overlap of a half inch on the sides. I also whip stitched the sides together up two inches.


Turn the tea cozy right side out. If you used velcro, you are finished! If you are using a button, attach your button to the inside of the piece opposite your button hole.

Button the sides together, and you are done! Now make some tea in your pot and use your cozy to keep it warm and toasty.

I hope this keeps you all busy while I am away visiting my sister next week. I will return to writing when I get back at the beginning of February. I still have a lot to do to get ready to go. I wanted to make some napkins to match the cozy out of the left over fabric today, so Dan can mail it off for me tomorrow. I also have to do the laundry and pack for the trip as well as a little house cleaning before I go. I wish you all creative thoughts and fun times while I am gone and look forward to hearing from people on their tea cozy adventures!


2 comments:
Brilliant! I have wanted to make one of these for ages!!! :) thanks for sharing!
Thanks so much for visiting! I hope you enjoy the project and have toasty tea. :)
Post a Comment